MPESA-DARAJA 2.0 || unofficial documentation to take you through from application to intergartion
1.PAYBILL/TILL APPLICATION PROCESS
Before we go through the hectic application process, Lets answer the question Which one should you choose? Paybill or till?
A short answer, It depends
If you intend to intergrate online mpesa payments to your system, paybill and till(BuyGoods) application requirements are almost similar. So the choice of whether to apply for a paybill or till all depends on how you intend to use it.
If your website requires only and only system online payments i.e via stkpush, then you can go for till, But if at a certain point you will need to track offline payments, Then a paybill is the ideal choice since it provides the account number option that can act as a unique identifier for your transaction
Not to limit yourself from scalability of your application, Always go for a Paybill since it has all capabilities a till has plus an added advantage
Requirements
- Application form download form.
- Tarrif Guide download form.
- Account Opening form download form.
- Administator details form download form.
- Administrators letter download sample.
- Bank letter/cancelled check
- Kra Pin Cert
- Copies of ID/Passport
All letters and forms should be stamped.
The bank letter should be signed or stamped.
NB//:
Individual till and bank paybills cannot be used for mpesa integrations, To integrate mpesa online payments with bank paybill or personal till you can use a service like Lipia-online
How to apply
After gathering all the required documents,Scan them as one document and write an email to M-PESABusiness@safaricom.co.ke CC: paybill@safaricom.co.ke requesting for the application of a till/paybill
NB//: Provide contact info on the email body
If all the requirements are met, Your application should be processed within 72hours. If you dont receive any communication in the first 24hours, recheck your documents and re-apply
What to expect
When the paybill/till is processed successfully, You will receive an sms with the details of:
- Business ShortCode (for paybills)
- Till Number & Store Number (for buy goods til)
Sample sms for paybill
Dear Name, Paybill Account has been activated for Business Name. Paybill Number ShortCode Thank you
The sms just shows that the application is successfull and your till/paybill is ready to receive funds
For online integration, The sms alone is not enough, You should receive an email with the admin details to allow you to go live on the daraja portal
Sample email for adminAccount
Your M-PESA user account for 4075139 - BUSINESS NAME has been created. Your username is this and your password is this
In most cases, Mpesa agents assume that the application is a just for normal use(for shops and physical businesses), Thus the admin details are not created by default. For that, if you receive the sms without the email, rewrite to the same emails now requesting admin account creation, Attach all the documents again but this time, The admin letter should be the first page
Once this is done and you receive the email, You are good to go
title: "MPESA-DARAJA 2.0 || unofficial documentation to take you through from application to intergartion"
source: "https://mpesa-docs.vercel.app/go-live"
author:
published:
created: 2026-06-29
description:
tags:
- "clippings"
2.GOING LIVE
After acquiring the paybill/till and admin account email sent to you, Going live is a simple as ABC..
But before we can go through the going live process, Let me make it clear that this process is for production till/paybills. If you are yet to acquire one, You can still develop on sandbox
For both live and testing development, You will need to have an account with daraja. If you dont have one, create account here
Why daraja portal?
For us to integrate online Mpesa payments to our systems, We need to have the following credentials
- Consumer Key
- Consumer Secret
- PassKey
We can get the three only from the daraja portal, These will later help us authenticate our requests.
Getting sandbox(test) credentials
Safaricom MPESA provides a sandbox environment to build and test your integrations
One logged in the daraja portal, On MY APPS tab, You select CREATE NEW APP
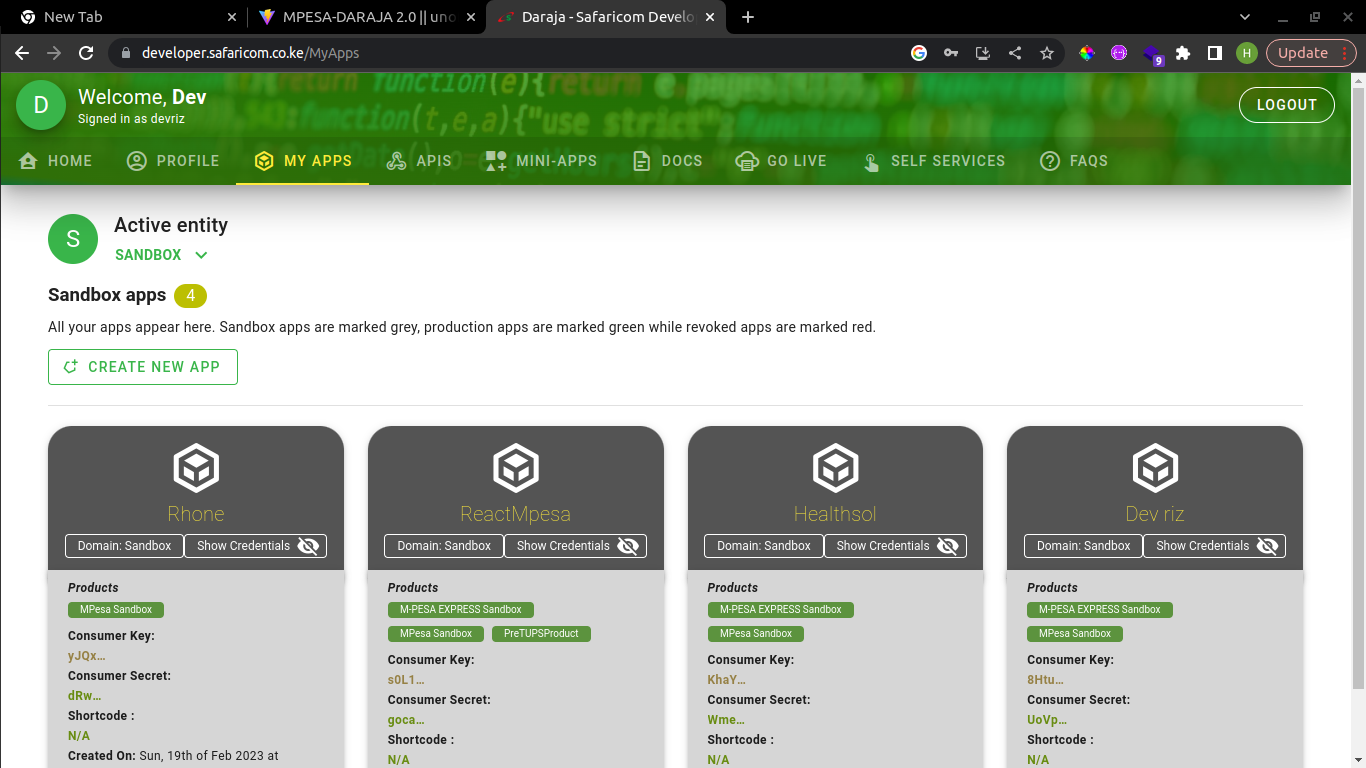
Check all the checkboxes to avoid inconvinieces
Once the app is created, it will be listed under sandbox apps and you can copy the Consumer Keyand Consumer secret from there
You will the click the APIS tab, it will take you to a this page 👇👇👇
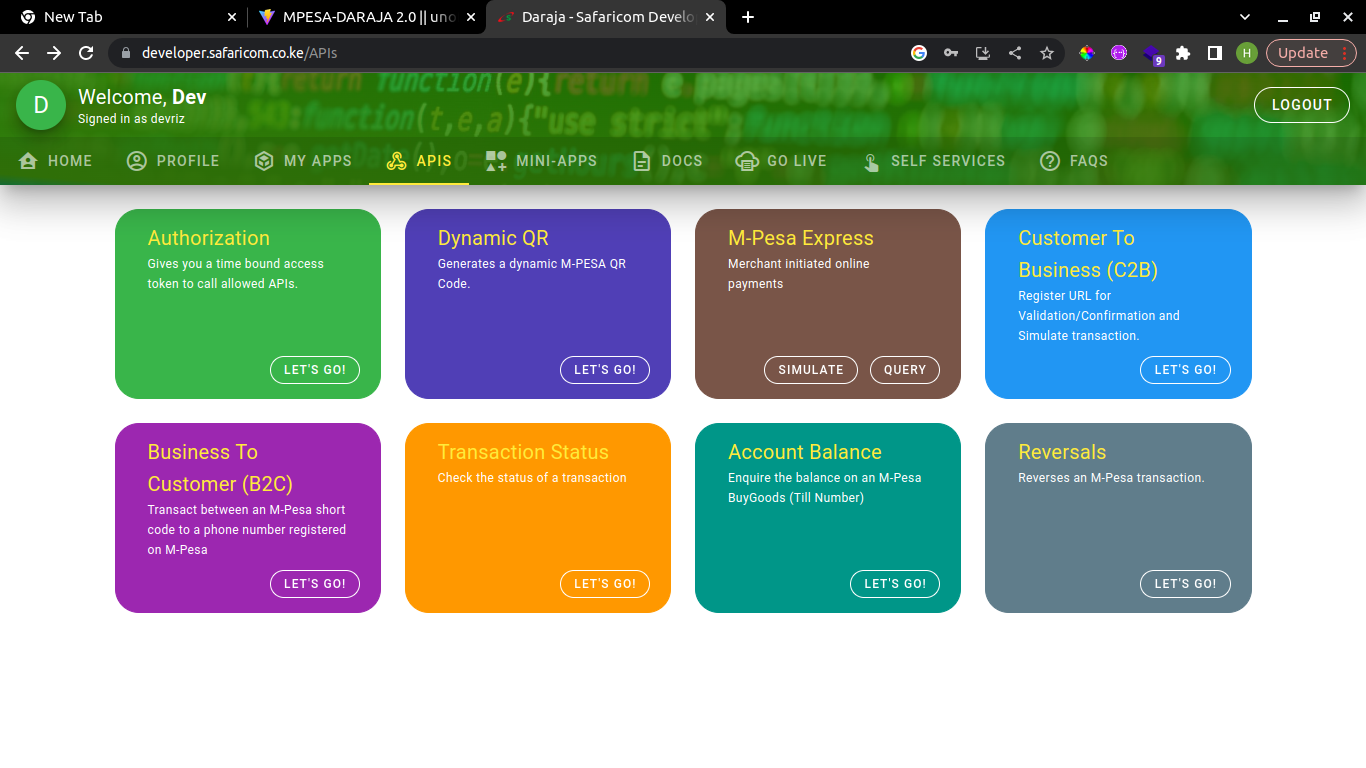
Click on simulate and you will be taken to this page 👇👇
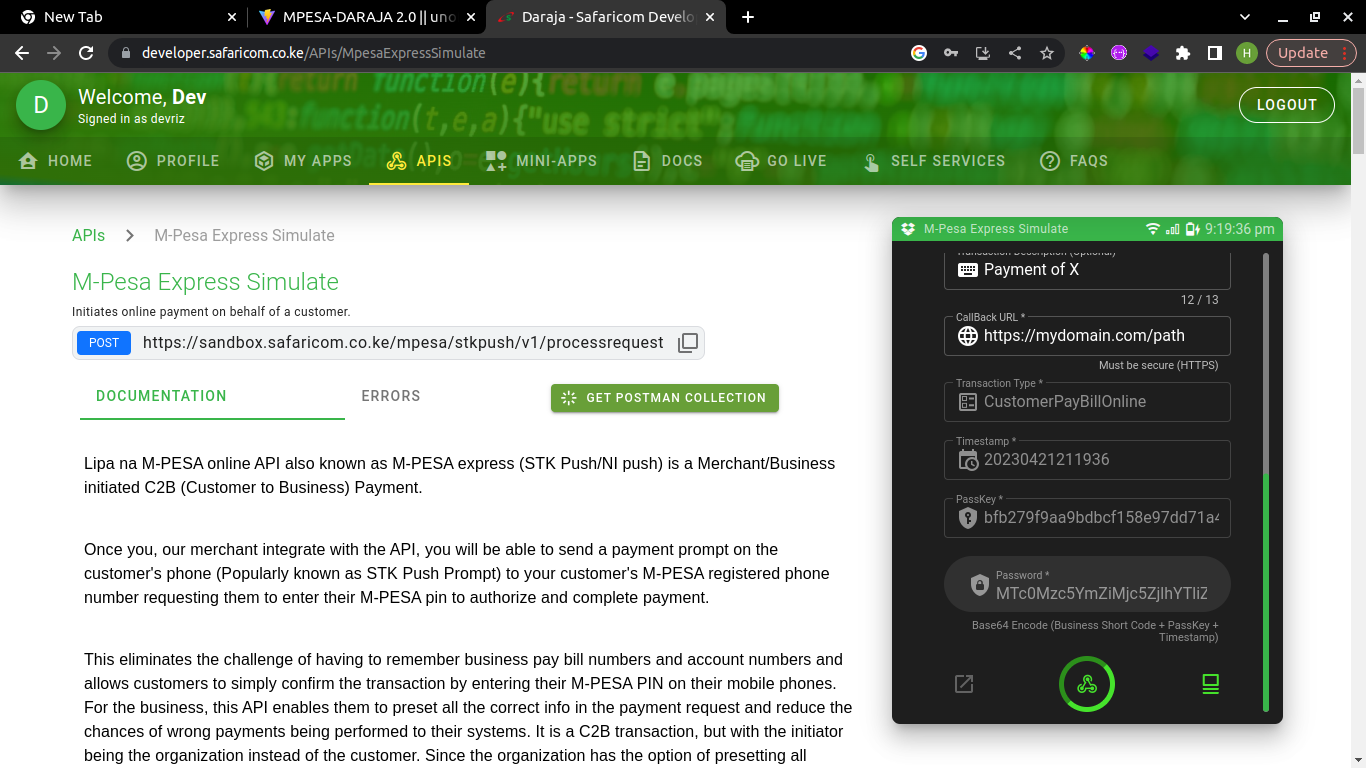
On your right hand side, Select your app from the dropdown and some credentials will show up as shown in the above image 👆 👆
Copy the pass key and You should be done with the daraja portal
Getting Live credentials
The process of acquiring credentials for a live paybill/till is quite simple and straight-forward
You wont need to create any app, Just head over to the GO LIVE tab and follow the promps
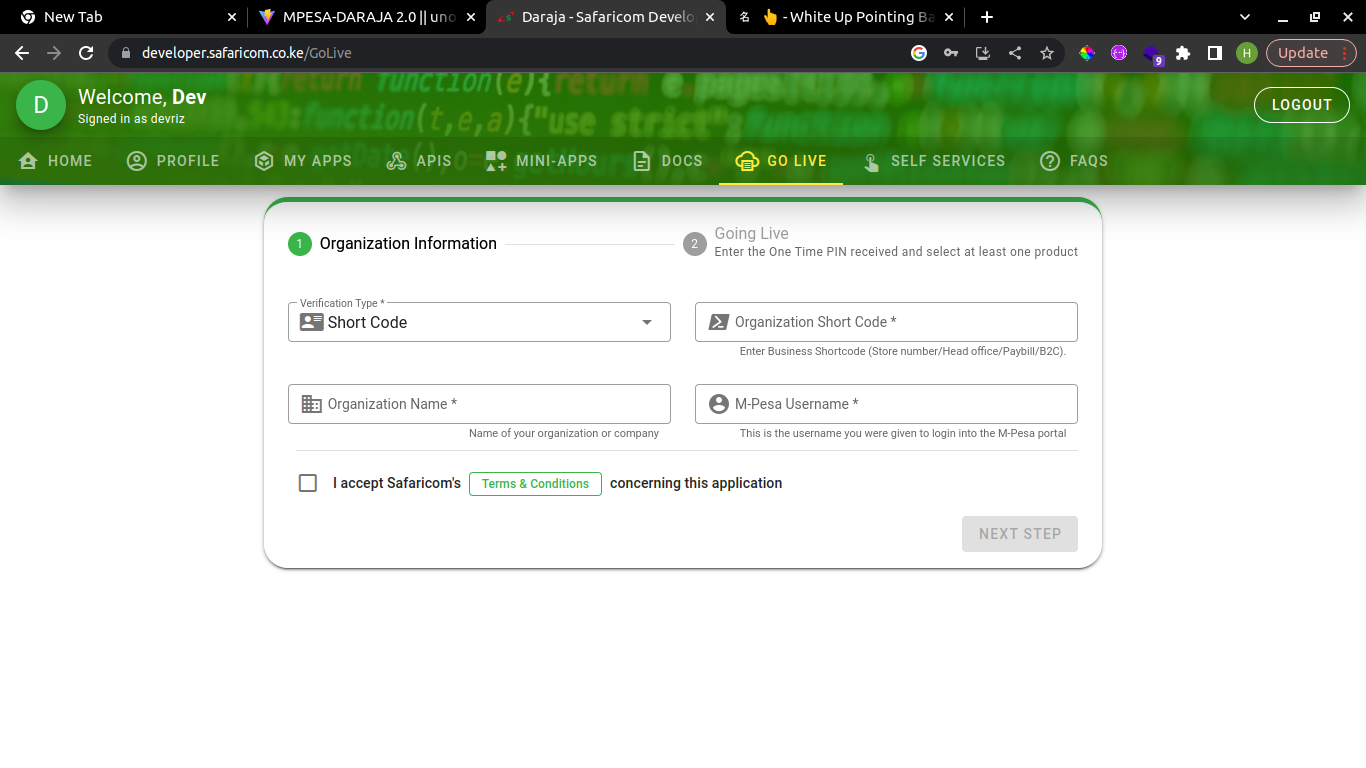
Once you're done, An app will be created with the Consumer Keyand Consumer secret provided
For live apps, the PASSKEY will be sent via email immediately after going live
Having gotten the three,
- Consumer Key
- Consumer Secret
- PassKey
We should be done with the daraja portal.
Lets now dive into the actual code
3.THE CODE WALKTHROUGH
at this point, we should be having the following,
M-PESA DARAJA provides a whole lot of payment APIs. Some of the commonly used are
In this session we are going to focus on:
Authorization API
This is the most crucial API since it generates a token that will be used to authenticate all the other APIs provided by safaricom daraja
The token generated from this API will be passed as Authorization Headers in all other API requests
The generated token from this api expires in seconds and you will need to generate it before any other request
For that purpose, we will create a function responsible to generate this and return the token. We shall then call this function and pass the return value as Authorization headers to the other APIs
Generate Token Function
This is how the request will look like
- Create a Base-64 encoding of Consumer Key +: + Consumer Secret (sample code shown below)
- Send a GET request and set the Authentication header with the value as Basic + [encoded value] from step 1.
- Send the request to the following endpoint:
Sample Code
const axios = require('axios');

const getAccessToken = () => {

    const consumerKey = yourConsumerKey
    const consumerSecret = yourConsumerKey

    //choose one depending on you development environment
    const url = "https://sandbox.safaricom.co.ke/oauth/v1/generate?grant_type=client_credentials",  //sandbox
    const url = "https://api.safaricom.co.ke/oauth/v1/generate?grant_type=client_credentials",  //live

  try {

    const encodedCredentials = new Buffer.from(consumerKey + ":" + consumerSecret).toString('base64');

    const headers = {
      'Authorization': "Basic" + " " + encodedCredentials',
      'Content-Type': 'application/json'
    };

    const response = await axios.get(url, { headers });
    return response.data.access_token;
  } catch (error) {

    throw new Error('Failed to get access token.');
  }
}
The above function will be imported and called before any other daraja API request
LIPA NA MPESA (STKPUSH) API
The Lipa na M-Pesa Online is an API designed by safaricon to allow developers and merchants to initiate transactions from online systems. However, for the transaction to be completed, a promp, STK PUSH, will be sent to the customer to validate the transaction by entering their MPESA pin
The request structure
1. Generate the current TimeStamp
const date = new Date();
const timestamp =
  date.getFullYear() +
  ("0" + (date.getMonth() + 1)).slice(-2) +
  ("0" + date.getDate()).slice(-2) +
  ("0" + date.getHours()).slice(-2) +
  ("0" + date.getMinutes()).slice(-2) +
  ("0" + date.getSeconds()).slice(-2);

  //you can use momentjs to generate the same in one line
2. Generate stk password to be passed as one of the required body parameters.
This is the Base64-encoded value of the concatenation of the Shortcode + Passkey + Timestamp,
NB// Incase of till number, the Shorcode is the store number
Generate stk password
const shortCode = "YOUR_PAYBILL";
const passkey = "YOUR_PASSKEY";
const timestamp = "generatedtimestamp"

const stk_password = new Buffer.from(shortCode + passkey + timestamp).toString(
  "base64"
);
3. A POST request to [https://sandbox.safaricom.co.ke/mpesa/stkpush/v1/processrequest\]
4. The request body
{
    "BusinessShortCode": "174379",
    "Password": "generatedpassword"
    "Timestamp": "generatedtimestamp",
    "TransactionType": "CustomerPayBillOnline",
    "Amount": "10",
    "PartyA": "254708374149",
    "PartyB": "174379",
    "PhoneNumber": "254708374149",
    "CallBackURL": "https://yourwebsite.co.ke/callbackurl"
    "AccountReference": "account",
    "TransactionDesc": "test" ,
}
BusinessShortCode
This is the paybill number for paybils and store number for till numbers
Password
This is the generated password from step 1.
TimeStamp
This is the generated password from step 2.
TransactionType
for paybills [CustomerPayBillOnline] and [CustomerBuyGoodsOnline] for buy goods Till
PartyA
The Customers phone number, Startig with 254
PartyB
Same with shortcode for paybill. For till numbers, we enter the till number on this section
PhoneNumber
Same as the PartyA
CallBackURL
Will discuss this in later sessions here
AccountReference
Account number for paybills.
TransactionDesc
Purpose of payment, just any string value.
5. Set the Authorization headers to Bearer [token].
The token is the return value from the generate token function
const token = await generateToken();

const headers = {
    'Authorization': 'Bearer ' + token,
    'Content-Type': 'application/json'
};
COMPLETE STK CODE
const axios = require('axios');

async function sendStkPush() {
  const token = await generateToken();
  const date = new Date();
  const timestamp =
  date.getFullYear() +
  ("0" + (date.getMonth() + 1)).slice(-2) +
  ("0" + date.getDate()).slice(-2) +
  ("0" + date.getHours()).slice(-2) +
  ("0" + date.getMinutes()).slice(-2) +
  ("0" + date.getSeconds()).slice(-2);

  //you can use momentjs to generate the same in one line

  const shortCode = "YOUR_PAYBILL"; //sandbox -174379
  const passkey = "YOUR_PASSKEY";


  const stk_password = new Buffer.from(shortCode + passkey + timestamp).toString(
        "base64"
      );

  //choose one depending on you development environment
  const url = "https://sandbox.safaricom.co.ke/mpesa/stkpush/v1/processrequest"
  const url = "https://api.safaricom.co.ke/mpesa/stkpush/v1/processrequest",

  const headers = {
    'Authorization': 'Bearer ' + token,
    'Content-Type': 'application/json'
  };

  const requestBody = {
    "BusinessShortCode": shortCode,
    "Password": stk_password,
    "Timestamp": timestamp,
    "TransactionType": "CustomerPayBillOnline", //till "CustomerBuyGoodsOnline"
    "Amount": "10",
    "PartyA": "254708374149",
    "PartyB": shortCode,
    "PhoneNumber": "254708374149",
    "CallBackURL": "https://yourwebsite.co.ke/callbackurl",
    "AccountReference": "account",
    "TransactionDesc": "test"
  };

  try {
    const response = await axios.post(url, requestBody, { headers });
    return response.data;
  } catch (error) {
    console.error(error);
  }
}
CONGRATULATIONS. YOU JUST SENT YOR FIRST STK PUSH!!
4.HANDLING CALLBACK DATA
Lets take a moment and understand what we have done in the previous session, So as to understand why this part is one of the most crucial in stk-push integration
Once you send the stk push api request, safaricom validates the request by checking if the body parameters and Authentication headers are correct
Any error received on stk push request might be as a result of:So when the stk push request is not successfull, You now know where to look
If the request is ok and it passes validation, An stk push will be sent to the phone number provided, and the request will return a successfull response.
So with just successfully sending stk push to a clients phone does not guarantee that the payment is successfull. The response just tells you as a developer that the push has been sent
After the user interacts with the push, i.e completes transaction or cancells transaction, Safaricom will send you back the data relating to that transaction to the url you provided in the callbackurl parameter in the body of the stkpush request
NB// Make sure you provide the exact path to the file/function that will handle the callback
valid callback url
For a callback url to be valid, It should be of the correct format i.e [https://mywebsite.com/path\]
note: You will need a live url for the callback to reach you. In this case localhost will not work. For development purposes, You can use ngrok that will open a live tunnel to your localhost port
What data to expect
After the user interacts with the stk push and its cleared on the users device screen, You will receive a post request to your callback url with the following data in the request body.
Successfull request(user confirmed transaction)
{
    "Body": {
        "stkCallback": {
            "MerchantRequestID": "12345-67890-12345",
            "CheckoutRequestID": "abcdefghijklmnopqrstuvwxyz",
            "ResultCode": 0,
            "ResultDesc": "The service was accepted successfully",
            "CallbackMetadata": {
                "Item": [
                    {
                        "Name": "Amount",
                        "Value": 100
                    },
                    {
                        "Name": "MpesaReceiptNumber",
                        "Value": "ABCDEFGHIJ"
                    },
                    {
                        "Name": "Balance"
                        "Value": 0
                    },
                    {
                        "Name": "TransactionDate",
                        "Value": "2023-04-26 12:30:00"
                    },
                    {
                        "Name": "PhoneNumber",
                        "Value": "254712345678"
                    }
                ]
            }
        }
    }
}
Unsuccessfull request
{
    "Body": {
        "stkCallback": {
            "MerchantRequestID": "12345-67890-12345",
            "CheckoutRequestID": "abcdefghijklmnopqrstuvwxyz",
            "ResultCode": 1032,
            "ResultDesc": "Request cancelled by user"
        }
    }
}
Let us now see how we can handle this data to make a decision on what to do with this data
first, lets make sure we are receiving this data. In the callback endpoint/file handling the url (the path provided as callback url). Have this code👇👇
In the case of nodejs, we can define a POST endpoint and to handle the callback.
In this case, our callback url will be [https://ourwebsite.com/callback\]
Security tip: How you call your callback endpoint should be confidential, If its known it could be a targeted by hackers
// Define the endpoint to receive the callback data based on your folder structure
//in my case the endpoint is on the index file and app represents the express app
app.post('/callback', (req, res) => {
  const callbackData = req.body;

  // Log the callback data to the console
  console.log(callbackData);

  // Send a response back to the M-Pesa
  res.json({ status: 'success' });
});
Handling The Data
As you noticed earlier, the callback is going to be sent to us regardless of whether the user confirms the transaction or not
So we need to differentiate a complete transaction from a failed one
For this we can check for the ResultCode Or check if the data includes the CallbackMetadata object
Logically we will write an if statement checking if the ResultCode is 0 and handle the data as a successful response, else handle as a failed transaction
Similary, we can check if the body includes the CallbackMetadata and handle it a successfull transaction else handle as a failed transaction
Handling Callback Complete Code
app.post('/callback', (req, res) => {
  const callbackData = req.body;

  // Check the result code
  const result_code = callbackData.Body.stkCallback.ResultCode;
  if (result_code !== 0) {
    // If the result code is not 0, there was an error
    const error_message = callbackData.Body.stkCallback.ResultDesc;
    const response_data = { ResultCode: result_code, ResultDesc: error_message };
    return res.json(response_data);
  }

  // If the result code is 0, the transaction was completed
  const body = req.body.Body.stkCallback.CallbackMetadata;

  // Get amount
  const amountObj = body.Item.find(obj => obj.Name === 'Amount');
  const amount = amountObj.Value

  // Get Mpesa code
  const codeObj = body.Item.find(obj => obj.Name === 'MpesaReceiptNumber');
  const mpesaCode = codeObj.Value

  // Get phone number
  const phoneNumberObj = body.Item.find(obj => obj.Name === 'PhoneNumber');
  const phone = phoneNumberObj.Value

  // Save the variables to a file or database, etc.
  // ...

  // Return a success response to mpesa
  return res.json("success");
});
5.HANDLING OFFLINE PAYBILL/TILL PAYMENTS
Handling offline paybill/till payments is made possible by using the C2B api availed by the mpesa daraja team
This API enables you to register webhooks that will be notified each time a transaction is made to the paybill or till number
The process of intergrating this API is straight forward as it involves some few step worth understanding
STEP 1 - REGISTERING URL
This step involves resgistering callback urls to safaricom to get notified when a customer wants or has paid through the mapped paybill /till
Just like the call back url that is provided on te LIPA NA MPESA(STK PUSH) parameters, these urls in this APIs are registered once and can be changed via the new self service service in the daraja portal
The initial registration of these urls is done via a http POST REQUEST to the REGISTER URLS endpoint provided by the daraja API
There are two URLs required for RegisterURL API: Validation URL and Confirmation URL.
**VALIDATION URL:**This is a url that will receive the callback before a transaction is completed. In basic terms, when a customer pays to your paybiill, before safaricom completes the payment, If this URL is enabled, Safaricom will check for any rules you set.
A practical use case of the logic writen in this url endpoint is when you would want to limit user paying to your paybill, eg if you expect a fixed amount payed for a certain service, you can reject the completion of transactions that dont fit your logic. Similary when creating a service that identifies users via the account number, You might want to invalidate payments with account numbers that dont exist in your DB
**CONFIRMATION URL:**This is the most important url since it will receive a POST request with data of a completed transaction
REGISTER URL REQUEST STRUCTURE
// URL
[POST] SANDBOX: https://sandbox.safaricom.co.ke/mpesa/c2b/v1/registerurl
[POST] LIVE:  https://api.safaricom.co.ke/mpesa/c2b/v1/registerurl

// HEADERS
Authorization: Bearer [access token]
Content-Type: application/json

// BODY
{
    "ShortCode": "601426",
    "ResponseType": "[Cancelled/Completed]",
    "ConfirmationURL": "[confirmation URL]",
    "ValidationURL": "[validation URL]"
}
ShortCode
This is the paybill number for paybils and store number for till numbers
Response Type
This defined the default action that will happen in case your Validation endpoint cannot be reached or fails to respond promptly. There are only two allowed values: "Completed" or "Cancelled." "Completed" indicates that M-Pesa will finalize the transaction automatically, while "Cancelled" means M-Pesa will automatically terminate the transaction.
Many at times, You wouldnt want to cancell transactions to your till or paybill in the validation url callback handler. So i would advice to keep this field as "Completed" unless you have specific use cases for terminating transactions to your paybill
ConfirmationURL
The callback url for complete transactions.
E.g https://mydomain.co.ke/api/confirmation-url
NB// should be a POST endpoint and will receive a JSON type body on completed transactions to your paybill/till
ValidationURL
The callback url for validation transactions before completion.
E.g https://mydomain.co.ke/api/validation-url
NB// Providing this endpoint in required but writting validation logic to it is optional since safaricom will default to the Response type provided.
SAMPLE RESPONSE ON REGISTERING URLS
{
    "ConversationID": "",
    "OriginatorCoversationID": "",
    "ResponseDescription": "success"
}
Any response apart from this will mean an error and you need to fix it.
# STEP 2 - HANDLING WEBHOOK BODY
We will handle the callback data in the confirmation url endpoint handler
Expected request body
{
  "TransactionType": "PayBill",
  "TransID": "LK12345678",
  "TransTime": "2023-08-23T14:30:00+03:00",
  "TransAmount": "1000.00",
  "BusinessShortCode": "123456",
  "BillRefNumber": "Invoice123",
  "InvoiceNumber": "",
  "OrgAccountBalance": "50000.00",
  "ThirdPartyTransID": "TX123456789",
  "MSISDN": "254712345678",
  "FirstName": "John",
  "MiddleName": "Doe",
  "LastName": "Smith"
}
For recent implimentation, The body might be different for newely intergrated paybills/tills as accordance to the data protection rule.