Most applications need to keep track of who their users are. When users connect with an application, they authenticate with it, a process by which they make their identity known. Once the application knows who the user is, it can offer a customized experience.
The most commonly used method of authentication requires users to provide a piece of identification, which is either their email address or username, and a secret only known to them, which is called the password. In this chapter, the complete authentication system for Flasky is created.
There are many excellent Python authentication packages, but none of them do everything. The user authentication solution presented in this chapter uses several packages and provides the glue that makes them work well together. This is the list of packages that will be used, and what they’re used for:
itsdangerous: Cryptographically secure token generation and verificationIn addition to authentication-specific packages, the following general-purpose extensions will be used:
The safety of user information stored in databases is often overlooked during the design of web applications. If an attacker is able to break into your server and access your user database, then you risk the security of your users—and the risk is bigger than you think. It is a known fact that most users use the same password on multiple sites, so even if you don’t store any sensitive information, access to the passwords stored in your database can give the attacker access to accounts your users have on other sites.
The key to storing user passwords securely in a database relies on not storing the password itself but a hash of it. A password hashing function takes a password as input, adds a random component to it (the salt), and then applies several one-way cryptographic transformations to it. The result is a new sequence of characters that has no resemblance to the original password, and has no known way to be transformed back into the original password. Password hashes can be verified in place of the real passwords because hashing functions are repeatable: given the same inputs (the password and the salt), the result is always the same.
Password hashing is a complex task that is hard to get right. It is recommended that you don’t implement your own solution but instead rely on well-known libraries that have been reviewed by the community. In the next section, Werkzeug’s password hashing functions will be demonstrated. Other good choices for password hashing are bcrypt and Passlib. If you are interested in learning what’s involved in generating secure password hashes, the article “Salted Password Hashing - Doing It Right” by Defuse Security is a worthwhile read.
Werkzeug’s security module conveniently implements secure password hashing. This functionality is exposed with just two functions, used in the registration and verification phases, respectively:
generate_password_hash(password, method='pbkdf2:sha256', salt_length=8)
This function takes a plain-text password and returns the password hash as a string that can be stored in the user database. The default values for method and salt_length are sufficient for most use cases.
check_password_hash(hash, password)
This function takes a password hash previously stored in the database and the password entered by the user. A return value of True indicates that the user password is correct.
Example 8-1 shows the changes to the User model created in Chapter 5 to accommodate password hashing.
The password hashing function is implemented through a write-only property called password. When this property is set, the setter method will call Werkzeug’s generate_password_hash() function and write the result to the password_hash field. Attempting to read the password property will return an error, as clearly the original password cannot be recovered once hashed.
The verify_password() method takes a password and passes it to Werkzeug’s check_password_hash() function for verification against the hashed version stored in the User model. If this method returns True, then the password is correct.
If you have cloned the application’s Git repository on GitHub, you can run git checkout 8a to check out this version of the application.
The password hashing functionality is now complete and can be tested in the shell:
Note how trying to access the password property of a user returns an AttributeError. Also, users u and u2 have completely different password hashes, even though they both use the same password. To ensure that this functionality continues to work in the future, the preceding tests done manually can be written as unit tests that can be repeated easily. In Example 8-2 a new module inside the tests package is shown with three new tests that exercise the recent changes to the User model.
To run these new unit tests, use the following command:
You can run the unit test suite like this every time you want to confirm everything is working as expected. Having the automation in place makes verifying this feature very low cost, so testing should be repeated often, to ensure that this functionality does not break in the future.
Blueprints were introduced in Chapter 7 as a way to define routes in the global scope after the creation of the application was moved into a factory function. In this section, the routes related to the user authentication subsystem will be added to a second blueprint, called auth. Using different blueprints for different subsystems of the application is a great way to keep the code neatly organized.
The auth blueprint will be hosted in a Python package with the same name. The blueprint’s package constructor creates the blueprint object and imports routes from a views.py module. This is shown in Example 8-3.
The app/auth/views.py module, shown in Example 8-4, imports the blueprint and defines the routes associated with authentication using its route decorator. For now, a /login route is added, which renders a placeholder template of the same name.
Note that the template file given to render_template() is stored inside the auth directory. This directory must be created inside app/templates, as Flask expects the templates’ paths to be relative to the application’s templates directory. By storing the blueprint templates in their own subdirectory, there is no risk of naming collisions with the main blueprint or any other blueprints that will be added in the future.
Blueprints can also be configured to have their own independent directories for templates. When multiple template directories have been configured, the render_template() function searches the templates directory configured for the application first, and then searches the template directories defined by blueprints.
The auth blueprint needs to be attached to the application in the create_app() factory function, as shown in Example 8-5.
The url_prefix argument in the blueprint registration is optional. When used, all the routes defined in the blueprint will be registered with the given prefix, in this case /auth. For example, the /login route will be registered as /auth/login, and the fully qualified URL under the development web server then becomes http://localhost:5000/auth/login.
If you have cloned the application’s Git repository on GitHub, you can run git checkout 8b to check out this version of the application.
When users log in to the application, their authenticated state has to be recorded in the user session, so that it is remembered as they navigate through different pages. Flask-Login is a small but extremely useful extension that specializes in managing this particular aspect of a user authentication system, without being tied to a specific authentication mechanism.
To begin, the extension needs to be installed in the virtual environment:
Flask-Login works closely with the application’s own User objects. To be able to work with the application’s User model, the Flask-Login extension requires it to implement a few common properties and methods. The required items are shown in Table 8-1.
| Property/method | Description |
|---|---|
is_authenticated | Must be True if the user has valid login credentials or False otherwise. |
is_active | Must be True if the user is allowed to log in or False otherwise. A False value can be used for disabled accounts. |
is_anonymous | Must always be False for regular users and True for a special user object that represents anonymous users. |
get_id() | Must return a unique identifier for the user, encoded as a Unicode string. |
These properties and methods can be implemented directly in the model class, but as an easier alternative Flask-Login provides a UserMixin class that has default implementations that are appropriate for most cases. The updated User model is shown in Example 8-6.
Note that an email field was also added. In this application, users will log in with their email addresses, as they are less likely to forget those than their usernames.
Flask-Login is initialized in the application factory function, as shown in Example 8-7.
The login_view attribute of the LoginManager object sets the endpoint for the login page. Flask-Login will redirect to the login page when an anonymous user tries to access a protected page. Because the login route is inside a blueprint, it needs to be prefixed with the blueprint name.
Finally, Flask-Login requires the application to designate a function to be invoked when the extension needs to load a user from the database given its identifier. This function is shown in Example 8-8.
The login_manager.user_loader decorator is used to register the function with Flask-Login, which will call it when it needs to retrieve information about the logged-in user. The user identifier will be passed as a string, so the function converts it to an integer before it passes it to the Flask-SQLAlchemy query that loads the user. The return value of the function must be the user object, or None if the user identifier is invalid or any other error occurred.
To protect a route so that it can only be accessed by authenticated users, Flask-Login provides a login_required decorator. An example of its usage follows:
You can see from this example that it is possible to “chain” multiple function decorators. When two or more decorators are added to a function, each decorator only affects those that are below it, in addition to the target function. In this example, the secret() function will be protected against unauthorized users with login_required, and then the resulting function will be registered with Flask as a route. Reversing the order will produce the wrong result, as the original function will be registered as a route before it receives the additional properties from the login_required decorator.
Thanks to the login_required decorator, if this route is accessed by a user who is not authenticated, Flask-Login will intercept the request and send the user to the login page instead.
The login form that will be presented to users has a text field for the email address, a password field, a “remember me” checkbox, and a submit button. The Flask-WTF form class that defines this form is shown in Example 8-9.
The PasswordField class represents an <input> element with type="password". The BooleanField class represents a checkbox.
The email field uses the Length() and Email() validators from WTForms in addition to DataRequired(), to ensure that the user not only provides a value for this field, but that it is valid. When providing a list of validators, WTForms will evaluate them in the order provided, and in case of a validation failure the error message shown will be the one of the first validator that failed.
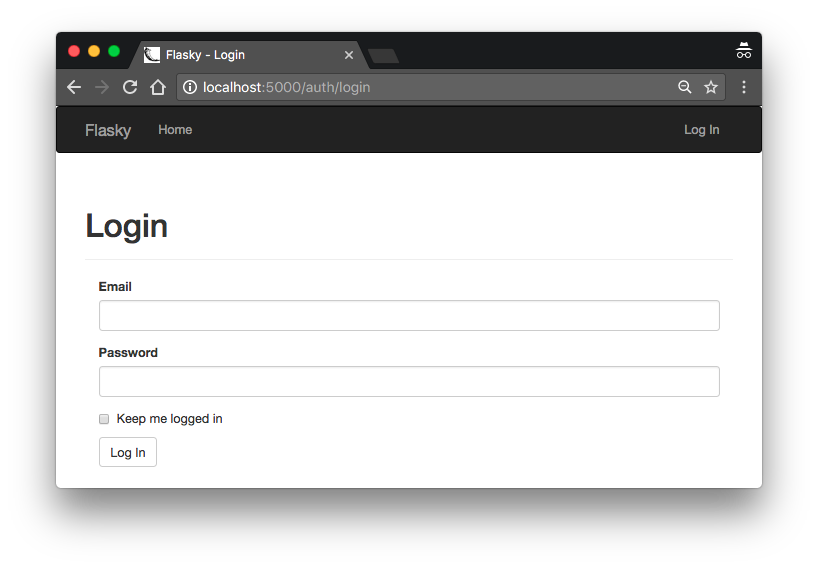
The template associated with the login page is stored in auth/login.html. This template just needs to render the form using Flask-Bootstrap’s wtf.quick_form() macro. Figure 8-1 shows the login form rendered by the web browser.
The login form
The navigation bar in the base.html template uses a Jinja2 conditional to display “Log In” or “Log Out” links depending on the logged-in state of the current user. The conditional is shown in Example 8-10.
The current_user variable used in the conditional is defined by Flask-Login and is automatically available to view functions and templates. This variable contains the currently logged-in user, or a proxy anonymous user object if the user is not logged in. Anonymous user objects have the is_authenticated property set to False, so the expression current_user.is_authenticated is a convenient way to know whether the current user is logged in.
The implementation of the login() view function is shown in Example 8-11.
The view function creates a LoginForm object and uses it like the simple form in Chapter 4. When the request is of type GET, the view function just renders the template, which in turn displays the form. When the form is submitted in a POST request, Flask-WTF’s validate_on_submit() function validates the form variables, and then attempts to log the user in.
To log a user in, the function begins by loading the user from the database using the email provided with the form. If a user with the given email address exists, then its verify_password() method is called with the password that also came with the form. If the password is valid, Flask-Login’s login_user() function is invoked to record the user as logged in for the user session. The login_user() function takes the user to log in and an optional “remember me” Boolean, which was also submitted with the form. A value of False for this argument causes the user session to expire when the browser window is closed, so the user will have to log in again next time. A value of True causes a long-term cookie to be set in the user’s browser, which Flask-Login uses to restore the user session. The optional REMEMBER_COOKIE_DURATION configuration option can be used to change the default one-year duration for the remember cookie.
In accordance with the Post/Redirect/Get pattern discussed in Chapter 4, the POST request that submitted the login credentials ends with a redirect, but there are two possible URL destinations. If the login form was presented to the user to prevent unauthorized access to a protected URL the user wanted to visit, then Flask-Login will have saved that original URL in the next query string argument, which can be accessed from the request.args dictionary. If the next query string argument is not available, a redirect to the home page is issued instead. The URL in next is validated to make sure it is a relative URL, to prevent a malicious user from using this argument to redirect unsuspecting users to another site.
For the case where the email address or password provided by the user is invalid, a flash message is set and the form is rendered again for the user to retry.
On a production server, the application must be made available over secure HTTP, so that login credentials and user sessions are always transmitted encrypted. Without secure HTTP, sensitive data can be intercepted during transit by an attacker.
The login template needs to be updated to render the form. These changes are shown in Example 8-12.
The implementation of the logout route is shown in Example 8-13.
To log a user out, Flask-Login’s logout_user() function is called to remove and reset the user session. The logout is completed with a flash message that confirms the action and a redirect to the home page.
If you have cloned the application’s Git repository on GitHub, you can run git checkout 8c to check out this version of the application. This update contains a database migration, so remember to run flask db upgrade after you check out the code. To ensure that you have all the dependencies installed, also run pip install -r requirements.txt.
Flask-Login is a fairly small extension, but due to the many moving pieces involved in the authentication flow, Flask users often have trouble understanding how the extension works. The following is the sequence of operations that occur when a user logs in to the system:
POST request instead of GET. login_user() function to log the user in.login_user() function writes the ID of the user to the user session as a string.current_user appears for the first time.current_user context variable does not have a value assigned for this request yet, so it invokes Flask-Login’s internal function _get_user() to find out who the user is._get_user() function checks if there is a user ID stored in the user session. If there isn’t one, it returns an instance of Flask-Login’s AnonymousUser. If there is an ID, it invokes the function that the application registered with the user_loader decorator, with the ID as its argument.user_loader handler reads the user from the database and returns it. Flask-Login assigns it to the current_user context variable for the current request.current_user.The login_required decorator builds on top of the current_user context variable by only allowing the decorated view function to run when the expression current_user.is_authenticated is True. The logout_user() function simply deletes the user ID from the user session.
To verify that the login functionality is working, the home page can be updated to greet the logged-in user by name. The template section that generates the greeting is shown in Example 8-14.
In this template once again current_user.is_authenticated is used to determine whether the user is logged in.
Because no user registration functionality has been built, a new user can only be registered from the shell at this time:
The user created previously can now log in. Figure 8-2 shows the application home page with the user logged in.
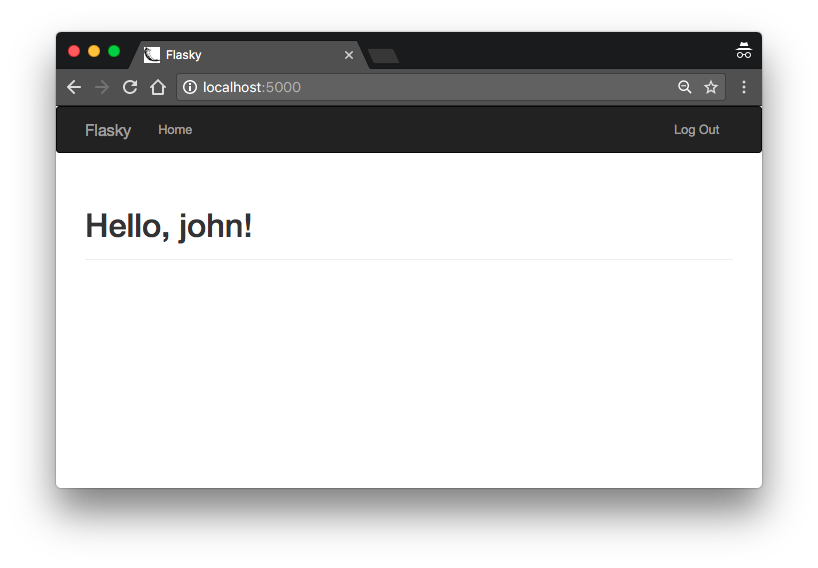
Home page after successful login
When new users want to become members of the application, they must register with it so that they are known and can log in. A link in the login page will send them to a registration page, where they can enter their email address, username, and password.
The form that will be used in the registration page asks the user to enter an email address, username, and password. This form is shown in Example 8-15.
This form uses the Regexp validator from WTForms to ensure that the username field starts with a letter and only contains letters, numbers, underscores, and dots. The two arguments to the validator that follow the regular expression are the regular expression flags and the error message to display on failure.
The password is entered twice as a safety measure, but this step makes it necessary to validate that the two password fields have the same content, which is done with another validator from WTForms called EqualTo. This validator is attached to one of the password fields with the name of the other field given as an argument.
This form also has two custom validators implemented as methods. When a form defines a method with the prefix validate_ followed by the name of a field, the method is invoked in addition to any regularly defined validators. In this case, the custom validators for email and username ensure that the values given are not duplicates. The custom validators indicate a validation error by raising a ValidationError exception with the text of the error message as an argument.
The template that presents this form is called /templates/auth/register.html. Like the login template, this one also renders the form with wtf.quick_form(). The registration page is shown in Figure 8-3.
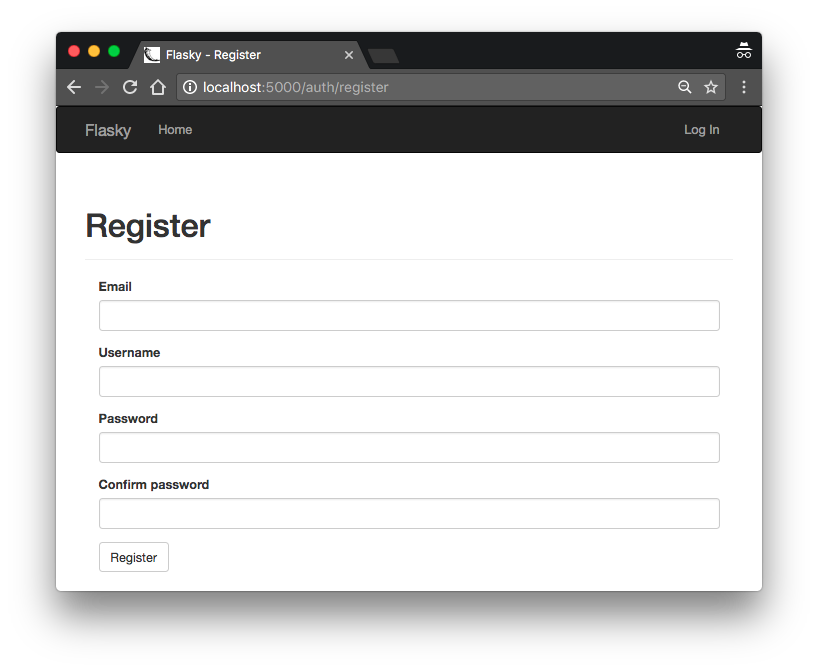
New user registration form
The registration page needs to be linked from the login page so that users who don’t have an account can easily find it. This change is shown in Example 8-16.
Handling user registrations does not present any big surprises. When the registration form is submitted and validated, a new user is added to the database using the information provided by the user. The view function that performs this task is shown in Example 8-17.
If you have cloned the application’s Git repository on GitHub, you can run git checkout 8d to check out this version of the application.
For certain types of applications, it is important to ensure that the user information provided during registration is valid. A common requirement is to ensure that the user can be reached through the provided email address.
To validate the email address, applications send a confirmation email to users immediately after they register. The new account is initially marked as unconfirmed until the instructions in the email are followed, which proves that the user has received the email. The account confirmation procedure usually involves clicking a specially crafted URL link that includes a confirmation token.
id assigned to the user in the database. When the user clicks the link, the view function that handles this route receives the user id to confirm as an argument and can easily update the confirmed status of the user. But this is obviously not a secure implementation, as any user who figures out the format of the confirmation links will be able to confirm arbitrary accounts just by sending random numbers in the URL. The idea is to replace the in the URL with a token that contains the same information, but in such a way that only the server can generate valid confirmation URLs. If you recall the discussion on user sessions in Chapter 4, Flask uses cryptographically signed cookies to protect the content of user sessions against tampering. The user session cookies contain a cryptographic signature generated by a package called itsdangerous. If the contents of the user session is altered, the signature will not match the content anymore, so Flask discards the session and starts a new one. The same concept can be applied to confirmation tokens.
The following is a short shell session that shows how itsdangerous can generate a signed token that contains a user id inside:
The itsdangerous package provides several types of token generators. Among them, the class TimedJSONWebSignatureSerializer generates JSON Web Signatures (JWSs) with a time expiration. The constructor of this class takes an encryption key as an argument, which in a Flask application can be the configured SECRET_KEY.
The dumps() method generates a cryptographic signature for the data given as an argument and then serializes the data plus the signature as a convenient token string. The expires_in argument sets an expiration time for the token, expressed in seconds.
To decode the token, the serializer object provides a loads() method that takes the token as its only argument. The function verifies the signature and the expiration time and, if both are valid, it returns the original data. When the loads() method is given an invalid token or a valid token that is expired, an exception is raised.
Token generation and verification using this functionality can be added to the User model. The changes are shown in Example 8-18.
The generate_confirmation_token() method generates a token with a default validity time of one hour. The confirm() method verifies the token and, if valid, sets the new confirmed attribute in the user model to True.
In addition to verifying the token, the confirm() function checks that the id from the token matches the logged-in user, which is stored in current_user. This ensures that a confirmation token for a given user cannot be used to confirm a different user.
Because a new column was added to the model to track the confirmed state of each account, a new database migration needs to be generated and applied.
The two new methods added to the User model are easily tested in unit tests. You can find the unit tests in the GitHub repository for the application.
The current /register route redirects to /index after adding the new user to the database. Before redirecting, this route now needs to send the confirmation email. This change is shown in Example 8-19.
Note that a db.session.commit() call had to be added before the confirmation email is sent out. The problem is that new users get assigned an id when they are committed to the database, and this id is needed to generate the confirmation token.
The email templates used by the authentication blueprint will be added in the templates/auth/email directory to keep them separate from the HTML templates. As discussed in Chapter 6, for each email two templates are needed for the plain-text and HTML versions of the body. As an example, Example 8-20 shows the plain-text version of the confirmation email template, and you can find the equivalent HTML version in the GitHub repository.
By default, url_for() generates relative URLs; so, for example, url_for('auth.confirm', token='abc') returns the string '/auth/confirm/abc'. This, of course, is not a valid URL that can be sent in an email, since it is only the path portion of the URL. Relative URLs work fine when they are used within the context of a web page because the browser converts them to absolute URLs by adding the hostname and port number from the current page, but when sending a URL over email there is no such context. The _external=True argument is added to the url_for() call to request a fully qualified URL that includes the scheme (http:// or https://), hostname, and port.
The view function that confirms accounts is shown in Example 8-21.
This route is protected with the login_required decorator from Flask-Login, so that when the users click on the link from the confirmation email they are asked to log in before they reach this view function.
The function first checks if the logged-in user is already confirmed, and in that case it redirects to the home page, as obviously there is nothing to do. This can prevent unnecessary work if a user clicks the confirmation token multiple times by mistake.
Because the actual token confirmation is done entirely in the User model, all the view function needs to do is call the confirm() method and then flash a message according to the result. When the confirmation succeeds, the User model’s confirmed attribute is changed and added to the session and then the database session is committed.
Each application can decide what unconfirmed users are allowed to do before they confirm their accounts. One possibility is to allow unconfirmed users to log in, but only show them a page that asks them to confirm their accounts before they can gain further access.
This step can be done using Flask’s before_request hook, which was briefly described in Chapter 2. From a blueprint, the before_request hook applies only to requests that belong to the blueprint. To install a blueprint hook for all application requests, the before_app_request decorator must be used instead. Example 8-22 shows how this handler is implemented.
The before_app_request handler will intercept a request when three conditions are true:
current_user.is_authenticated is True).If these three conditions are met, then a redirect is issued to a new /auth/unconfirmed route that shows a page with information about account confirmation.
When a before_request or before_app_request callback returns a response or a redirect, Flask sends that to the client without invoking the view function associated with the request. This effectively allows these callbacks to intercept a request when necessary.
The page that is presented to unconfirmed users (shown in Figure 8-4) just renders a template that gives users instructions for how to confirm their accounts and offers a link to request a new confirmation email, in case the original email was lost. The route that resends the confirmation email is shown in Example 8-23.
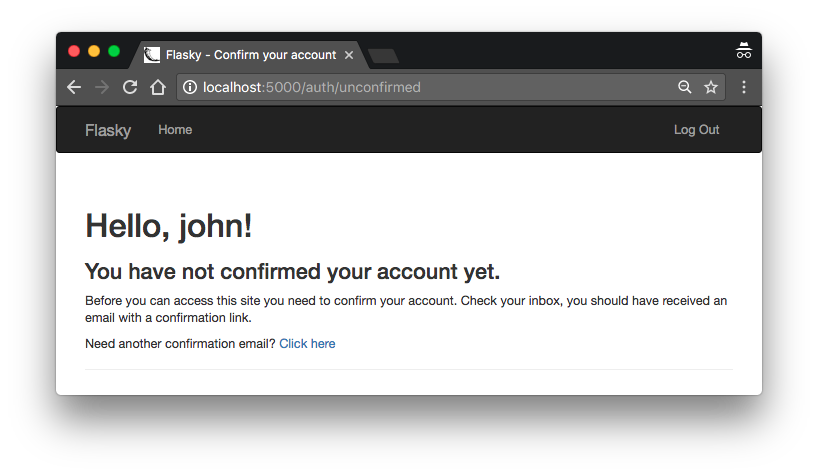
Unconfirmed account page
This route repeats what was done in the registration route using current_user, the user who is logged in, as the target user. This route is also protected with login_required to ensure that when it is accessed, the user that is making the request is authenticated.
If you have cloned the application’s Git repository on GitHub, you can run git checkout 8e to check out this version of the application. This update contains a database migration, so remember to run flask db upgrade after you check out the code.
Users who have accounts with the application may need to make changes to their accounts from time to time. The following tasks can be added to the authentication blueprint using the techniques presented in this chapter:
Password updates
Security-conscious users may want to change their passwords periodically. This is an easy feature to implement, because as long as the user is logged in, it is safe to present a form that asks for the old password and a new password to replace it. This feature is implemented as commit 8f in the GitHub repository. As part of this change, the “Log Out” link in the navigation bar was refactored into a dropdown that contains the “Change Password” and “Log Out” links.
Password resets
To avoid locking users out of the application when they forget their passwords, a password reset option can be offered. To implement password resets in a secure way, it is necessary to use tokens similar to those used to confirm accounts. When a user requests a password reset, an email with a reset token is sent to the registered email address. The user then clicks the link in the email and, after the token is verified, a form is presented where a new password can be entered. This feature is implemented as commit 8g in the GitHub repository.
Email address changes
Users can be given the option to change their registered email address, but before the new address is accepted it must be verified with a confirmation email. To use this feature, the user enters the new email address in a form. To confirm the email address, a token is emailed to that address. When the server receives the token back, it can update the user object. While the server waits to receive the token, it can store the new email address in a new database field reserved for pending email addresses, or it can store the address in the token along with the id. This feature is implemented as commit 8h in the GitHub repository.
In the next chapter, the user subsystem of Flasky will be extended through the use of user roles.
Table of contents collapsed
Select a result to preview