Blog Posts
Chapter 11. Blog Posts
This chapter is dedicated to the implementation of Flasky’s main feature, which is to allow users to read and write blog posts. Here you will learn a few new techniques for reuse of templates, pagination of long lists of items, and working with rich text.
Blog Post Submission and Display
To support blog posts, a new database model that represents them is necessary. This model is shown in Example 11-1.
Example 11-1. app/models.py: Post model
A blog post is represented by a body, a timestamp, and a one-to-many relationship from the User model. The body field is defined with type db.Text so that there is no limitation on the length.
The form that will be shown in the main page of the application lets users write a blog post. This form is very simple; it contains just a text area where the blog post can be typed and a submit button. The form definition is shown in Example 11-2.
Example 11-2. app/main/forms.py: blog post form
The index() view function handles the form and passes the list of old blog posts to the template, as shown in Example 11-3.
Example 11-3. app/main/views.py: home page route with a blog post
This view function passes the form and the complete list of blog posts to the template. The list of posts is ordered by timestamp, in descending order. The blog post form is handled in the usual manner, with the creation of a new Post instance when a valid submission is received. The current user’s permission to write articles is checked before allowing the new post.
Note how the author attribute of the new post object is set to the expression current_user._get_current_object(). The current_user variable from Flask-Login, like all context variables, is implemented as a thread-local proxy object. This object behaves like a user object but is really a thin wrapper that contains the actual user object inside. The database needs a real user object, which is obtained by calling _get_current_object() on the proxy object.
The form is rendered below the greeting in the index.html template, followed by the blog posts. The list of blog posts is a first attempt to create a blog post timeline, with all the blog posts in the database listed in chronological order from newest to oldest. The changes to the template are shown in Example 11-4.
Example 11-4. app/templates/index.html: home page template with blog posts
Note that the User.can() method is used to skip the blog post form for users who do not have the WRITE permission in their role. The blog post list is implemented as an HTML unordered list, with CSS classes giving it a nicer formatting. A small avatar of the author is rendered on the left side, and both the avatar and the author’s username are rendered as links to the user’s profile page. The CSS styles used are stored in the styles.css file located in the application’s static directory. You can review this file in the GitHub repository. Figure 11-1 shows the home page with submission form and blog post list.
Tip
If you have cloned the application’s Git repository on GitHub, you can run git checkout 11a to check out this version of the application. This update contains a database migration, so remember to run flask db upgrade after you check out the code.
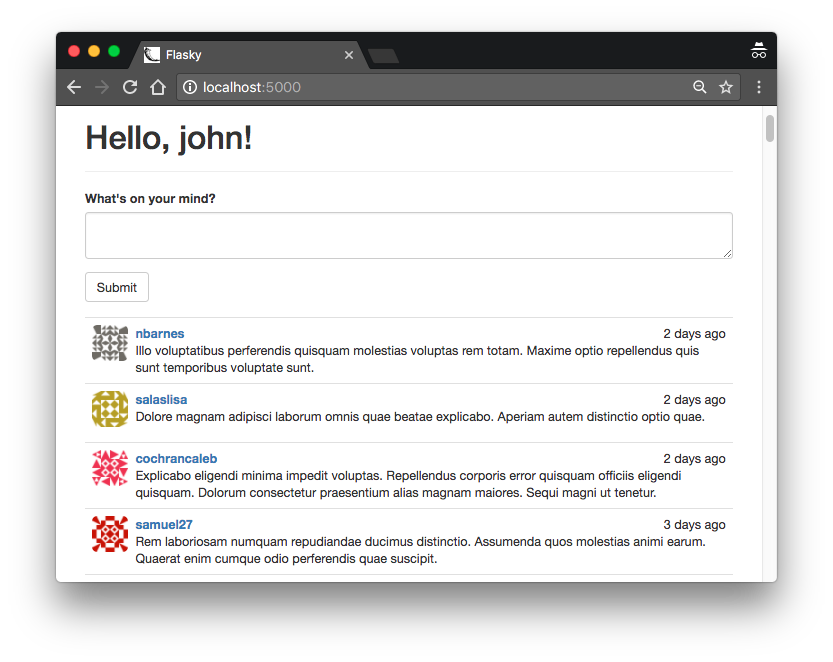
Home page with blog submission form and blog post list
Blog Posts on Profile Pages
The user profile page can be improved by showing a list of blog posts authored by the user.Example 11-5 shows the changes to the view function to obtain the post list.
The list of blog posts for a user is obtained from the User.posts relationship. This works like a query object, so filters such as order_by() can be used on it like in a regular query object.
The user.html template needs to have the same <ul> HTML tree that renders a list of blog posts in index.html, but having to maintain two identical copies of a piece of HTML code is not ideal. For cases like this, Jinja2’s include directive is very useful. The snippet of HTML that generates the post list can be moved to a separate file that both index.html and user.html can include. Example 11-6 shows how this include looks in user.html.
To complete this reorganization, the <ul> tree from index.html is moved to the new template _posts.html, and replaced with another include directive like the one just shown. Note that the use of an underscore prefix in the _posts.html template name is not a requirement; this is merely a convention to distinguish full and partial templates.
Tip
If you have cloned the application’s Git repository on GitHub, you can run git checkout 11b to check out this version of the application.
Paginating Long Blog Post Lists
As the site grows and the number of blog posts increases, it will become slow and impractical to show the complete list of posts on the home and profile pages. Big pages take longer to generate, download, and render in the web browser, so the quality of the user experience decreases as the pages get larger. The solution is to paginate the data and render it in chunks.
Creating Fake Blog Post Data
To be able to work with multiple pages of blog posts, it is necessary to have a test database with a large volume of data. Manually adding new database entries is time consuming and tedious; an automated solution is more appropriate. There are several Python packages that can be used to generate fake information. A fairly complete one is Faker, which is installed with pip:
The Faker package is not, strictly speaking, a dependency of the application, because it is needed only during development. To separate the production dependencies from the development dependencies, the requirements.txt file can be replaced with a requirements subdirectory that stores different sets of dependencies. Inside this new subdirectory, a dev.txt file can list the dependencies that are necessary for development and a prod.txt file can list the dependencies that are needed in production. As there are a large number of dependencies that will be in both lists, a common.txt file is added for those, and then the dev.txt and prod.txt lists use the -r prefix to include it. Example 11-7 shows the dev.txt file.
Example 11-7. requirements/dev.txt: development requirements file
Example 11-8 shows a new module added to the application that contains two functions that generate fake users and posts.
Example 11-8. app/fake.py: generating fake users and blog posts
The attributes of these fake objects are produced by random information generators provided by the Faker package, which can generate real-looking names, emails, sentences, and many more attributes.
The email addresses and usernames of users must be unique, but since Faker generates these in a completely random fashion, there is a risk of having duplicates. In the unlikely event that a duplicate is generated, the database session commit will throw an IntegrityError exception. The exception is handled by rolling back the session to cancel that duplicate user. The loop will run until the requested number of unique users are generated.
The random post generation must assign a random user to each post. For this, the offset() query filter is used. This filter discards the number of results given as an argument. By setting a random offset and then calling first(), a different random user is obtained each time.
Tip
If you have cloned the application’s Git repository on GitHub, you can run git checkout 11c to check out this version of the application. To ensure that you have all the dependencies installed, also run pip install -r requirements/dev.txt.
The new functions make it easy to create a large number of fake users and posts from the Python shell:
If you run the application now, you will see a long list of random blog posts on the home page, by many different users.
Rendering in Pages
Example 11-9 shows the changes to the home page route to support pagination.
Example 11-9. app/main/views.py: paginating the blog post list
The page number to render is obtained from the request’s query string, which is available as request.args. When a page isn’t given, a default page of 1 (the first page) is used. The type=int argument ensures that if the argument cannot be converted to an integer, the default value is returned.
To load a single page of records, the final call to the all() method of the query object is replaced with Flask-SQLAlchemy’s paginate(). The paginate() method takes the page number as its first and only required argument. An optional per_page argument can be given to indicate the size of each page, in number of items. If this argument is not specified, the default is 20 items per page. Another optional argument called error_out can be set to True (the default) to issue a code 404 error when a page outside of the valid range is requested. If error_out is False, pages outside of the valid range are returned with an empty list of items. To make the page sizes configurable, the value of the per_page argument is read from an application-specific configuration variable called FLASKY_POSTS_PER_PAGE that is added in config.py.
With these changes, the blog post list on the home page will show a limited number of items. To see the second page of posts, add a ?page=2 query string to the URL in the browser’s address bar.
Adding a Pagination Widget
The return value of paginate() is an object of class Pagination, a class defined by Flask-SQLAlchemy. This object contains several properties that are useful to generate page links in a template, so it is passed to the template as an argument. A summary of the attributes of the pagination object is shown in Table 11-1.
| Attribute | Description |
|---|---|
items | The records in the current page |
query | The source query that was paginated |
page | The current page number |
prev_num | The previous page number |
next_num | The next page number |
has_next | True if there is a next page |
has_prev | True if there is a previous page |
pages | The total number of pages for the query |
per_page | The number of items per page |
total | The total number of items returned by the query |
The pagination object also has some methods, listed in Table 11-2.
| Method | Description |
|---|---|
iter_pages(left_edge=2, left_current=2, right_current=5, right_edge=2) | An iterator that returns the sequence of page numbers to display in a pagination widget. The list will have left_edge pages on the left side, left_current pages to the left of the current page, right_current pages to the right of the current page, and right_edge pages on the right side. For example, for page 50 of 100 this iterator configured with default values will return the following pages: 1, 2, None, 48, 49, 50, 51, 52, 53, 54, 55, None, 99, 100. A None value in the sequence indicates a gap in the sequence of pages. |
prev() | A pagination object for the previous page. |
next() | A pagination object for the next page. |
Armed with this powerful object and Bootstrap’s pagination CSS classes, it is quite easy to build a pagination footer in the template. The implementation shown in Example 11-10 is done as a reusable Jinja2 macro.
Example 11-10. app/templates/_macros.html: pagination template macro
{% macro pagination_widget(pagination, endpoint) %}
<ul class="pagination">
<li{% if not pagination.has_prev %} class="disabled"{% endif %}>
<a href="{% if pagination.has_prev %}{{ url_for(endpoint,
page = pagination.page - 1, **kwargs) }}{% else %}#{% endif %}">
«
</a>
</li>
{% for p in pagination.iter_pages() %}
{% if p %}
{% if p == pagination.page %}
<li class="active">
<a href="{{ url_for(endpoint, page = p, **kwargs) }}">{{ p }}</a>
</li>
{% else %}
<li>
<a href="{{ url_for(endpoint, page = p, **kwargs) }}">{{ p }}</a>
</li>
{% endif %}
{% else %}
<li class="disabled"><a href="#">…</a></li>
{% endif %}
{% endfor %}
<li{% if not pagination.has_next %} class="disabled"{% endif %}>
<a href="{% if pagination.has_next %}{{ url_for(endpoint,
page = pagination.page + 1, **kwargs) }}{% else %}#{% endif %}">
»
</a>
</li>
</ul>
{% endmacro %}
The macro creates a Bootstrap pagination element, which is a styled unordered list. It defines the following page links inside it:
- A “previous page” link. This link gets the
disabledCSS class if the current page is the first page. - Links to all pages returned by the pagination object’s
iter_pages()iterator. These pages are rendered as links with an explicit page number, given as an argument tourl_for(). The page currently displayed is highlighted using theactiveCSS class. Gaps in the sequence of pages are rendered with the ellipsis character. - A “next page” link. This link will appear disabled if the current page is the last page.
Jinja2 macros always receive keyword arguments without having to include **kwargs in the argument list. The pagination macro passes all the keyword arguments it receives to the url_for() call that generates the pagination links. This approach can be used with routes such as the profile page that have a dynamic part.
The pagination_widget macro can be added below the _posts.html template included by index.html and user.html.Example 11-11 shows how it is used in the application’s home page.
Example 11-11. app/templates/index.html: pagination footer for blog post lists
Figure 11-2 shows how the pagination links appear in the page.
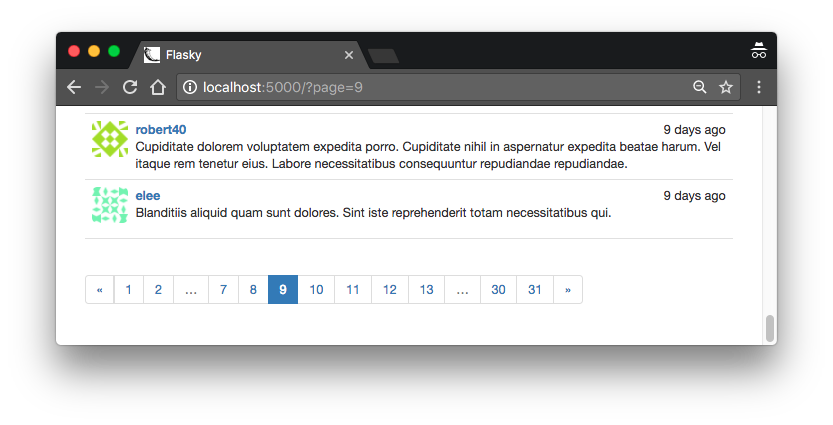
Blog post pagination
Tip
If you have cloned the application’s Git repository on GitHub, you can run git checkout 11d to check out this version of the application.
Rich-Text Posts with Markdown and Flask-PageDown
Plain-text posts are sufficient for short messages and status updates, but users who want to write longer articles will find the lack of formatting very limiting. In this section, the text area field where posts are entered will be upgraded to support the Markdown syntax and present a rich-text preview of the post.
The implementation of this feature requires a few new packages:
- PageDown, a client-side Markdown-to-HTML converter implemented in JavaScript
- Flask-PageDown, a PageDown wrapper for Flask that integrates PageDown with Flask-WTF forms
- Markdown, a server-side Markdown-to-HTML converter implemented in Python
- Bleach, an HTML sanitizer implemented in Python
The Python packages can all be installed with pip:
Using Flask-PageDown
The Flask-PageDown extension defines a PageDownField class that has the same interface as the TextAreaField from WTForms. Before this field can be used, the extension needs to be initialized as shown in Example 11-12.
Example 11-12. app/__init__.py: Flask-PageDown initialization
To convert the text area control in the home page to a Markdown rich-text editor, the body field of the PostForm must be changed to a PageDownField as shown in Example 11-13.
Example 11-13. app/main/forms.py: Markdown-enabled post form
The Markdown preview is generated with the help of the PageDown libraries, so these must be added to the template. Flask-PageDown simplifies this task by providing a template macro that includes the required files from a CDN as shown in Example 11-14.
Example 11-14. app/templates/index.html: Flask-PageDown template declaration
Tip
If you have cloned the application’s Git repository on GitHub, you can run git checkout 11e to check out this version of the application. To ensure that you have all the dependencies installed also run pip install -r requirements/dev.txt.
With these changes, Markdown-formatted text typed in the text area field will be immediately rendered as HTML in the preview area below. Figure 11-3 shows the blog submission form with rich text.
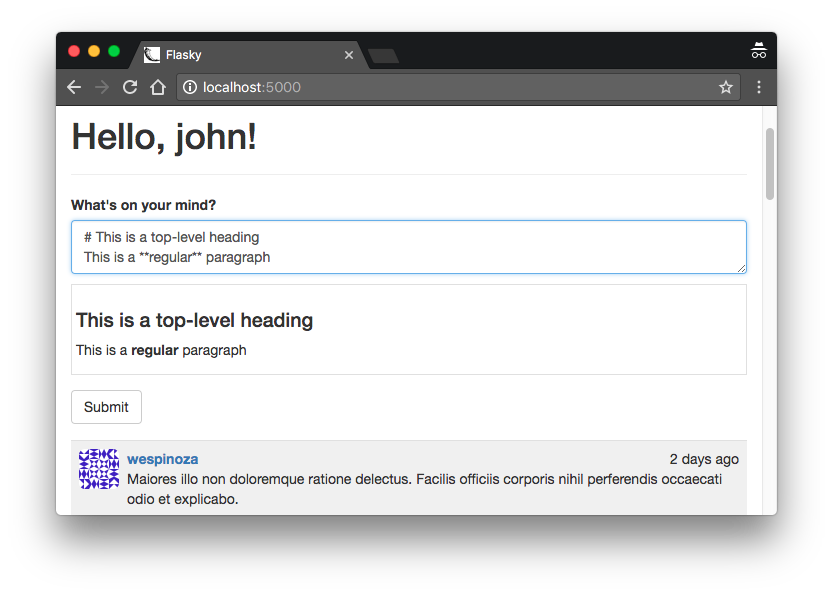
Rich text blog post form
Handling Rich Text on the Server
When the form is submitted, only the raw Markdown text is sent with the POST request; the HTML preview that is shown on the page is discarded. Sending the generated HTML preview with the form can be considered a security risk, as it would be fairly easy for an attacker to construct HTML sequences that do not match the Markdown source and submit them. To avoid any risks, only the Markdown source text is submitted, and once in the server it is converted again to HTML using Markdown, a Python Markdown-to-HTML converter. The resulting HTML is sanitized with Bleach to ensure that only a short list of allowed HTML tags are used.
The conversion of the Markdown blog posts to HTML can be done in the _posts.html template, but this is inefficient as posts will have to be converted every time they are rendered to a page. To avoid this repetition, the conversion can be done once when the blog post is created and then cached in the database. The HTML code for the rendered blog post is cached in a new field added to the Post model that the template can access directly. The original Markdown source is also kept in the database in case the post needs to be edited. Example 11-15 shows the changes to the Post model.
Example 11-15. app/models.py: Markdown text handling in the Post model
The on_changed_body() function is registered as a listener of SQLAlchemy’s “set” event for body, which means that it will be automatically invoked whenever the body field is set to a new value. The handler function renders the HTML version of the body and stores it in body_html, effectively making the conversion of the Markdown text to HTML fully automatic.
The actual conversion is done in three steps. First, the markdown() function does an initial conversion to HTML. The result is passed to clean(), along with the list of approved HTML tags. The clean() function removes any tags not on the whitelist. The final conversion is done with linkify(), another function provided by Bleach that converts any URLs written in plain text into proper <a> links. This last step is necessary because automatic link generation is not officially in the Markdown specification, but is a very convenient feature. On the client side, PageDown supports this feature as an optional extension, so linkify() matches that functionality on the server.
The last change is to replace post.body with post.body_html in the template when available, as shown in Example 11-16.
Example 11-16. app/templates/_posts.html: use the HTML version of the post bodies in the template
The | safe suffix when rendering the HTML body is there to tell Jinja2 not to escape the HTML elements. Jinja2 escapes all template variables by default as a security measure, but the Markdown-generated HTML was generated by the server, so it is safe to render directly as HTML.
Tip
If you have cloned the application’s Git repository on GitHub, you can run git checkout 11f to check out this version of the application. This update also contains a database migration, so remember to run flask db upgrade after you check out the code. To ensure that you have all the dependencies installed also run pip install -r requirements/dev.txt.
Permanent Links to Blog Posts
Users may want to share links to specific blog posts with friends on social networks. For this purpose, each post will be assigned a page with a unique URL that references it. The route and view function that support permanent links are shown in Example 11-17.
Example 11-17. app/main/views.py: enabling permanent links to posts
The URLs that will be assigned to blog posts are constructed with the unique id field assigned when the post is inserted in the database.
Note
For some types of applications, building permanent links that use readable URLs instead of numeric IDs may be preferred. An alternative to numeric IDs is to assign each blog post a slug, which is a unique string that is based on the title or first few words of the post.
Note that the post.html template receives a list with a single element that is the post to render. Sending a list is a matter of convenience, so that the _posts.html template referenced by index.html and user.html can be used in this page as well.
The permanent links are added at the bottom of each post in the generic _posts.html template, as shown in Example 11-18.
Example 11-18. app/templates/_posts.html: adding permanent links to posts
The new post.html template that renders the permanent link page is shown in Example 11-19. It includes the example template.
Example 11-19. app/templates/post.html: permanent link template
Tip
If you have cloned the application’s Git repository on GitHub, you can run git checkout 11g to check out this version of the application.
Blog Post Editor
The last feature related to blog posts is a post editor that allows users to edit their own posts. The blog post editor lives in a standalone page and is also based on Flask-PageDown, so a text area where the Markdown text of the blog post can be edited is followed by a rendered preview. The edit_post.html template is shown in Example 11-20.
Example 11-20. app/templates/edit_post.html: edit blog post template
The route that supports the blog post editor is shown in Example 11-21.
This view function is coded to allow only the author of a blog post to edit it, except for administrators, who are allowed to edit posts from all users. If a user tries to edit a post from another user, the view function responds with a 403 code. The PostForm web form class used here is the same one used on the home page.
To complete the feature, a link to the blog post editor can be added below each blog post, next to the permanent link, as shown in Example 11-22.
Example 11-22. app/templates/_posts.html: adding the edit blog post link
This change adds an “Edit” link to any blog posts that are authored by the current user. For administrators, the link is added to all posts. The administrator link is styled differently as a visual cue that this is an administration feature. Figure 11-4 shows how the Edit and Permalink links look in the web browser.
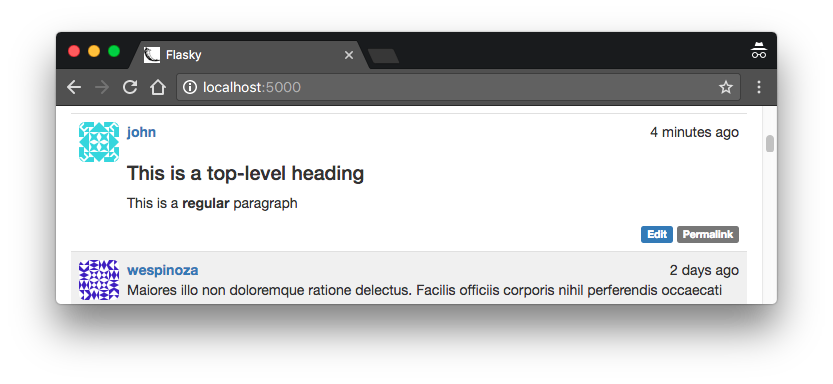
Edit and Permalink links in blog posts
Tip
If you have cloned the application’s Git repository on GitHub, you can run git checkout 11h to check out this version of the application.
Table of contents collapsed