Databases
Chapter 5. Databases
A database stores application data in an organized way. The application then issues queries to retrieve specific portions of the data as they are needed. The most commonly used databases for web applications are those based on the relational model, also called SQL databases in reference to the Structured Query Language they use. But in recent years document-oriented and key-value databases, informally known together as NoSQL databases, have become popular alternatives.
SQL Databases
Relational databases store data in tables, which model the different entities in the application’s domain. For example, a database for an order management application will likely have customers, products, and orders tables.
A table has a fixed number of columns and a variable number of rows. The columns define the data attributes of the entity represented by the table. For example, a customers table will have columns such as name, address, phone, and so on. Each row in a table defines an actual data element that assigns values to some or all the columns.
Tables have a special column called the primary key, which holds a unique identifier for each row stored in the table. Tables can also have columns called foreign keys, which reference the primary key of a row in the same or another table. These links between rows are called relationships and are the foundation of the relational database model.
Figure 5-1 shows a diagram of a simple database with two tables that store users and user roles. The line that connects the two tables represents a relationship between the tables.
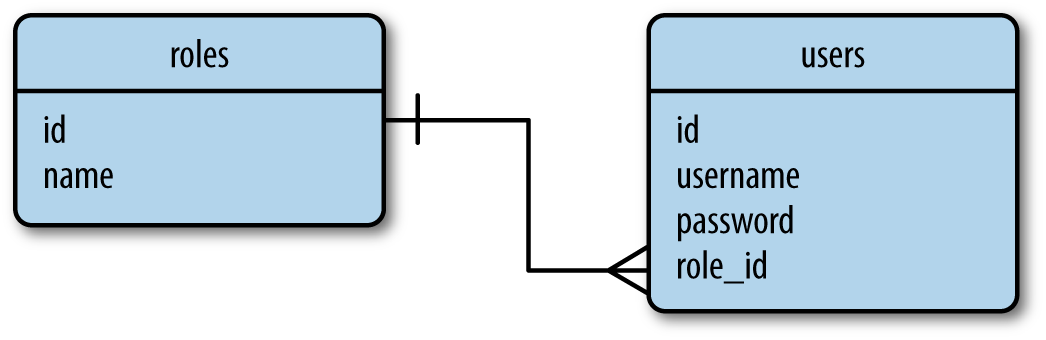
Relational database example
This graphical style of representing the structure of a database is called an entity-relationship diagram. In this representation, boxes represent database tables, showing lists of the table’s attributes or columns. The roles table stores the list of all possible user roles, each identified by a unique id value—the table’s primary key. The users table contains the list of users, each with its own unique id as well. Besides the id primary keys, the roles table has a name column and the users table has username and password columns.
The role_id column in the users table is a foreign key. The line that connects the roles.id and users.role_id columns represents a relationship between the two tables. The symbols attached to the line at each end indicate the cardinality of the relationship. On the roles.id side, the line is shown to have a “one,” while on the users.role_id side a “many” is represented. This depicts a one-to-many relationship, indicating that each row from the roles table can be associated with many rows from the users table.
As seen in the example, relational databases store data efficiently and avoid duplication. Renaming a user role in this database is simple because role names exist in a single place. Immediately after a role name is changed in the roles table, all users that have a role_id that references the changed role will see the update.
On the other hand, having the data split into multiple tables can be a complication. Producing a listing of users with their roles presents a small problem, because users and user roles need to be read from two tables and joined before they can be presented together. Relational database engines provide the support to perform join operations between tables when necessary.
NoSQL Databases
Databases that do not follow the relational model described in the previous section are collectively referred to as NoSQL databases. One common organization for NoSQL databases uses collections instead of tables and documents instead of records. NoSQL databases are designed in a way that makes joins difficult, so most of them do not support this operation at all. For a NoSQL database structured as in Figure 5-1, listing the users with their roles requires the application itself to perform the join operation by reading the role_id field of each user and then searching the roles table for it.
A more appropriate design for a NoSQL database is shown in Figure 5-2. This is the result of applying an operation called denormalization, which reduces the number of tables at the expense of data duplication.
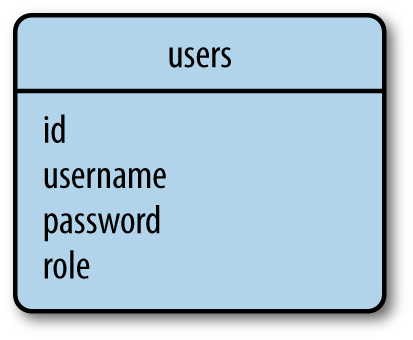
NoSQL database example
A database with this structure has the role name explicitly stored with each user. Renaming a role can then turn out to be an expensive operation that may require updating a large number of documents.
But it isn’t all bad news with NoSQL databases. Having the data duplicated allows for faster querying. Listing users and their roles is straightforward because no joins are needed.
SQL or NoSQL?
SQL databases excel at storing structured data in an efficient and compact form. These databases go to great lengths to preserve consistency, even in the face of power failures or hardware malfunctions. The paradigm that allows relational databases to reach this high level of reliability is called ACID, which stands for Atomicity, Consistency, Isolation, and Durability. NoSQL databases relax some of the ACID requirements and as a result can sometimes get a performance edge.
A full analysis and comparison of database types is outside the scope of this book. For small to medium-sized applications, both SQL and NoSQL databases are perfectly capable and have practically equivalent performance.
Python Database Frameworks
Python has packages for most database engines, both open source and commercial. Flask puts no restrictions on what database packages can be used, so you can work with MySQL, Postgres, SQLite, Redis, MongoDB, CouchDB, or DynamoDB if any of these is your favorite.
As if those weren’t enough choices, there are also a number of database abstraction layer packages, such as SQLAlchemy or MongoEngine, that allow you to work at a higher level with regular Python objects instead of database entities such as tables, documents, or query languages.
There are a number of factors to evaluate when choosing a database framework:
Ease of use
When comparing straight database engines to database abstraction layers, the second group clearly wins. Abstraction layers, also called object-relational mappers (ORMs) or object-document mappers (ODMs), provide transparent conversion of high-level object-oriented operations into low-level database instructions.
Performance
The conversions that ORMs and ODMs have to do to translate from the object domain into the database domain have an overhead. In most cases, the performance penalty is negligible, but it may not always be. In general, the productivity gain obtained with ORMs and ODMs far outweighs a minimal performance degradation, so this isn’t a valid argument to drop ORMs and ODMs completely. What makes sense is to choose a database abstraction layer that provides optional access to the underlying database in case specific operations need to be optimized by implementing them directly as native database instructions.
Portability
The database choices available on your development and production platforms must be considered. For example, if you plan to host your application on a cloud platform, then you should find out what database choices this service offers.
Another portability aspect applies to ORMs and ODMs. Although some of these frameworks provide an abstraction layer for a single database engine, others abstract even higher and provide a choice of database engines—all accessible with the same object-oriented interface. The best example of this is the SQLAlchemy ORM, which supports a list of relational database engines including the popular MySQL, Postgres, and SQLite.
Flask integration
Choosing a framework that has integration with Flask is not absolutely required, but it will save you from having to write the integration code yourself. Flask integration could simplify configuration and operation, so using a package specifically designed as a Flask extension should be preferred.
Based on these goals, the chosen database framework for the examples in this book will be Flask-SQLAlchemy, the Flask extension wrapper for SQLAlchemy.
Database Management with Flask-SQLAlchemy
Flask-SQLAlchemy is a Flask extension that simplifies the use of SQLAlchemy inside Flask applications. SQLAlchemy is a powerful relational database framework that supports several database backends. It offers a high-level ORM and low-level access to the database’s native SQL functionality.
Like most other extensions, Flask-SQLAlchemy is installed with pip:
In Flask-SQLAlchemy, a database is specified as a URL. Table 5-1 lists the format of the URLs for the three most popular database engines.
| Database engine | URL |
|---|---|
| MySQL | mysql://username:password@hostname/database |
| Postgres | postgresql://username:password@hostname/database |
| SQLite (Linux, macOS) | sqlite:////absolute/path/to/database |
| SQLite (Windows) | sqlite:///c:/absolute/path/to/database |
In these URLs, hostname refers to the server that hosts the database service, which could be localhost or a remote server. Database servers can host several databases, so database indicates the name of the database to use. For databases that need authentication, username and password are the database user credentials.
Note
SQLite databases do not have a server, so hostname, username, and password are omitted and database is the filename on disk for the database.
The URL of the application database must be configured as the key SQLALCHEMY_DATABASE_URI in the Flask configuration object. The Flask-SQLAlchemy documentation also suggests setting key SQLALCHEMY_TRACK_MODIFICATIONS to False to use less memory unless signals for object changes are needed. Consult the Flask-SQLAlchemy documentation for information on other configuration options. Example 5-1 shows how to initialize and configure a simple SQLite database.
Example 5-1. hello.py: database configuration
The db object instantiated from the class SQLAlchemy represents the database and provides access to all the functionality of Flask-SQLAlchemy.
Model Definition
The term model is used when referring to the persistent entities used by the application. In the context of an ORM, a model is typically a Python class with attributes that match the columns of a corresponding database table.
The database instance from Flask-SQLAlchemy provides a base class for models as well as a set of helper classes and functions that are used to define their structure. The roles and users tables from Figure 5-1 can be defined as the models Role and User as shown in Example 5-2.
Example 5-2. hello.py: Role and User model definition
The __tablename__ class variable defines the name of the table in the database. Flask-SQLAlchemy assigns a default table name if __tablename__ is omitted, but those default names do not follow the popular convention of using plurals for table names, so it is best to name tables explicitly. The remaining class variables are the attributes of the model, defined as instances of the db.Column class.
The first argument given to the db.Column constructor is the type of the database column and model attribute. Table 5-2 lists some of the column types that are available, along with the Python types used in the model.
| Type name | Python type | Description |
|---|---|---|
Integer | int | Regular integer, typically 32 bits |
SmallInteger | int | Short-range integer, typically 16 bits |
BigInteger | int or long | Unlimited precision integer |
Float | float | Floating-point number |
Numeric | decimal.Decimal | Fixed-point number |
String | str | Variable-length string |
Text | str | Variable-length string, optimized for large or unbounded length |
Unicode | unicode | Variable-length Unicode string |
UnicodeText | unicode | Variable-length Unicode string, optimized for large or unbounded length |
Boolean | bool | Boolean value |
Date | datetime.date | Date value |
Time | datetime.time | Time value |
DateTime | datetime.datetime | Date and time value |
Interval | datetime.timedelta | Time interval |
Enum | str | List of string values |
PickleType | Any Python object | Automatic Pickle serialization |
LargeBinary | str | Binary blob |
The remaining arguments to db.Column specify configuration options for each attribute. Table 5-3 lists some of the options available.
| Option name | Description |
|---|---|
primary_key | If set to True, the column is the table’s primary key. |
unique | If set to True, do not allow duplicate values for this column. |
index | If set to True, create an index for this column, so that queries are more efficient. |
nullable | If set to True, allow empty values for this column. If set to False, the column will not allow null values. |
default | Define a default value for the column. |
Note
Flask-SQLAlchemy requires all models to define a primary key column, which is commonly named id.
Although it’s not strictly necessary, the two models include a __repr__() method to give them a readable string representation that can be used for debugging and testing purposes.
Relationships
Relational databases establish connections between rows in different tables through the use of relationships. The relational diagram in Figure 5-1 expresses a simple relationship between users and their roles. This is a one-to-many relationship from roles to users, because one role can belong to many users, but each user can have only one role.
Example 5-3 shows how the one-to-many relationship in Figure 5-1 is represented in the model classes.
Example 5-3. hello.py: relationships in the database models
As seen in Figure 5-1, a relationship connects two rows through the use of a foreign key. The role_id column added to the User model is defined as a foreign key, and that establishes the relationship. The 'roles.id' argument to db.ForeignKey() specifies that the column should be interpreted as having id values from rows in the roles table.
The users attribute added to the model Role represents the object-oriented view of the relationship, as seen from the “one” side. Given an instance of class Role, the users attribute will return the list of users associated with that role (i.e., the “many” side). The first argument to db.relationship() indicates what model is on the other side of the relationship. The model class can be provided as a string if the class is defined later in the module.
The backref argument to db.relationship() defines the reverse direction of the relationship, by adding a role attribute to the User model. This attribute can be used on any instance of User instead of the role_id foreign key to access the Role model as an object.
In most cases db.relationship() can locate the relationship’s foreign key on its own, but sometimes it cannot determine what column to use as a foreign key. For example, if the User model had two or more columns defined as Role foreign keys, then SQLAlchemy would not know which one of the two to use. Whenever the foreign key configuration is ambiguous, additional arguments to db.relationship() need to be given. Table 5-4 lists some of the common configuration options that can be used to define a relationship.
| Option name | Description |
|---|---|
backref | Add a back reference in the other model in the relationship. |
primaryjoin | Specify the join condition between the two models explicitly. This is necessary only for ambiguous relationships. |
lazy | Specify how the related items are to be loaded. Possible values are select (items are loaded on demand the first time they are accessed), immediate (items are loaded when the source object is loaded), joined (items are loaded immediately, but as a join), subquery (items are loaded immediately, but as a subquery), noload (items are never loaded), and dynamic (instead of loading the items, the query that can load them is given). |
uselist | If set to False, use a scalar instead of a list. |
order_by | Specify the ordering used for the items in the relationship. |
secondary | Specify the name of the association table to use in many-to-many relationships. |
secondaryjoin | Specify the secondary join condition for many-to-many relationships when SQLAlchemy cannot determine it on its own. |
Tip
If you have cloned the application’s Git repository on GitHub, you can run git checkout 5a to check out this version of the application.
There are other relationship types besides one-to-many. The one-to-one relationship can be expressed the same way as one-to-many, as described earlier, but with the uselist option set to False within the db.relationship() definition so that the “many” side becomes a “one” side. The many-to-one relationship can also be expressed as a one-to-many if the tables are reversed, or it can be expressed with the foreign key and the db.relationship() definition both on the “many” side. The most complex relationship type, many-to-many, requires an additional table called an association or junction table. You will learn about many-to-many relationships in Chapter 12.
Database Operations
The models are now fully configured according to the database diagram in Figure 5-1 and are ready to be used. The best way to learn how to work with these models is in a Python shell. The following sections will walk you through the most common database operations in a shell started with the flask shell command. Before you use this command, make sure the FLASK_APP environment variable is set to hello.py, as shown in Chapter 2.
Creating the Tables
The very first thing to do is to instruct Flask-SQLAlchemy to create a database based on the model classes. The db.create_all() function locates all the subclasses of db.Model and creates corresponding tables in the database for them:
If you check the application directory, you will now see a new file there called data.sqlite, the name that was given to the SQLite database in the configuration. The db.create_all() function will not re-create or update a database table if it already exists in the database. This can be inconvenient when the models are modified and the changes need to be applied to an existing database. The brute-force solution to update existing database tables to a different schema is to remove the old tables first:
Unfortunately, this method has the undesired side effect of destroying all the data in the old database. A better solution to the problem of updating databases is presented near the end of the chapter.
Inserting Rows
The following example creates a few roles and users:
The constructors for models accept initial values for the model attributes as keyword arguments. Note that the role attribute can be used, even though it is not a real database column but a high-level representation of the one-to-many relationship. The id attribute of these new objects is not set explicitly: the primary keys in many databases are managed by the database itself. The objects exist only on the Python side so far; they have not been written to the database yet. Because of that, their id values have not yet been assigned:
Changes to the database are managed through a database session, which Flask-SQLAlchemy provides as db.session. To prepare objects to be written to the database, they must be added to the session:
Or, more concisely:
To write the objects to the database, the session needs to be committed by calling its commit() method:
Check the id attributes again after having the data committed to see that they are now set:
Database sessions are extremely useful in keeping the database consistent. The commit operation writes all the objects that were added to the session atomically. If an error occurs while the session is being written, the whole session is discarded. If you always commit related changes together in a session, you are guaranteed to avoid database inconsistencies due to partial updates.
Note
A database session can also be rolled back. If db.session.rollback() is called, any objects that were added to the database session are restored to the state they have in the database.
Modifying Rows
The add() method of the database session can also be used to update models. Continuing in the same shell session, the following example renames the "Admin" role to "Administrator":
Deleting Rows
The database session also has a delete() method. The following example deletes the "Moderator" role from the database:
Note that deletions, like insertions and updates, are executed only when the database session is committed.
Querying Rows
Flask-SQLAlchemy makes a query object available in each model class. The most basic query for a model is triggered with the all() method, which returns the entire contents of the corresponding table:
A query object can be configured to issue more specific database searches through the use of filters. The following example finds all the users that were assigned the "User" role:
It is also possible to inspect the native SQL query that SQLAlchemy generates for a given query by converting the query object to a string:
If you exit the shell session, the objects created in the previous example will cease to exist as Python objects but will continue to exist as rows in their respective database tables. If you then start a brand-new shell session, you have to re-create the Python objects from their database rows. The following example issues a query that loads the user role with name "User":
Note how in this case, the query was issued with the first() method instead of all(). While all() returns all the results of the query as a list, first() returns only the first result or None if there are no results, so it is a convenient method to use for queries that are known to return one result at the most.
Filters such as filter_by() are invoked on a query object and return a new refined query. Multiple filters can be called in sequence until the query is configured as needed.
Table 5-5 shows some of the most common filters available to queries. The complete list is in the SQLAlchemy documentation.
| Option | Description |
|---|---|
filter() | Returns a new query that adds an additional filter to the original query |
filter_by() | Returns a new query that adds an additional equality filter to the original query |
limit() | Returns a new query that limits the number of results of the original query to the given number |
offset() | Returns a new query that applies an offset into the list of results of the original query |
order_by() | Returns a new query that sorts the results of the original query according to the given criteria |
group_by() | Returns a new query that groups the results of the original query according to the given criteria |
After the desired filters have been applied to the query, a call to all() will cause the query to execute and return the results as a list—but there are other ways to trigger the execution of a query besides all(). Table 5-6 shows other query execution methods.
| Option | Description |
|---|---|
all() | Returns all the results of a query as a list |
first() | Returns the first result of a query, or None if there are no results |
first_or_404() | Returns the first result of a query, or aborts the request and sends a 404 error as the response if there are no results |
get() | Returns the row that matches the given primary key, or None if no matching row is found |
get_or_404() | Returns the row that matches the given primary key or, if the key is not found, aborts the request and sends a 404 error as the response |
count() | Returns the result count of the query |
paginate() | Returns a Pagination object that contains the specified range of results |
Relationships work similarly to queries. The following example queries the one-to-many relationship between roles and users from both ends:
The user_role.users query here has a small problem. The implicit query that runs when the user_role.users expression is issued internally calls all() to return the list of users. Because the query object is hidden, it is not possible to refine it with additional query filters. In this particular example, it may have been useful to request that the user list be returned in alphabetical order. In Example 5-4, the configuration of the relationship is modified with a lazy='dynamic' argument to request that the query is not automatically executed.
Example 5-4. hello.py: dynamic database relationships
With the relationship configured in this way, user_role.users returns a query that hasn’t executed yet, so filters can be added to it:
Database Use in View Functions
The database operations described in the previous sections can be used directly inside view functions. Example 5-5 shows a new version of the home page route that records names entered by users in the database.
Example 5-5. hello.py: database use in view functions
In this modified version of the application, each time a name is submitted the application checks for it in the database using the filter_by() query filter. A known variable is written to the user session so that after the redirect the information can be sent to the template, where it is used to customize the greeting. Note that for the application to work, the database tables must be created in a Python shell as shown earlier.
The new version of the associated template is shown in Example 5-6. This template uses the known argument to add a second line to the greeting that is different for known and new users.
Tip
If you have cloned the application’s Git repository on GitHub, you can run git checkout 5b to check out this version of the application.
Integration with the Python Shell
Having to import the database instance and the models each time a shell session is started is tedious work. To avoid having to constantly repeat these steps, the flask shell command can be configured to automatically import these objects.
To add objects to the import list, a shell context processor must be created and registered with the app.shell_context_processor decorator. This is shown in Example 5-7.
Example 5-7. hello.py: adding a shell context
The shell context processor function returns a dictionary that includes the database instance and the models. The flask shell command will import these items automatically into the shell, in addition to app, which is imported by default:
Tip
If you have cloned the application’s Git repository on GitHub, you can run git checkout 5c to check out this version of the application.
Database Migrations with Flask-Migrate
As you make progress developing an application, you will find that your database models need to change, and when that happens the database needs to be updated as well. Flask-SQLAlchemy creates database tables from models only when they do not exist already, so the only way to make it update tables is by destroying the old tables first—but of course, this causes all the data in the database to be lost.
A better solution is to use a database migration framework. In the same way source code version control tools keep track of changes to source code files, a database migration framework keeps track of changes to a database schema, allowing incremental changes to be applied.
The developer of SQLAlchemy has written a migration framework called Alembic, but instead of using Alembic directly, Flask applications can use the Flask-Migrate extension, a lightweight Alembic wrapper that integrates it with the flask command.
Creating a Migration Repository
To begin, Flask-Migrate must be installed in the virtual environment:
Example 5-8 shows how the extension is initialized.
Example 5-8. hello.py: Flask-Migrate initialization
To expose the database migration commands, Flask-Migrate adds a flask db command with several subcommands. When you work on a new project, you can add support for database migrations with the init subcommand:
This command creates a migrations directory, where all the migration scripts will be stored. If you are following the example project using git checkout, you do not need to do this step, as the migration repository is already included in the GitHub repository.
Tip
The files in a database migration repository must always be added to version control along with the rest of the application.
Creating a Migration Script
In Alembic, a database migration is represented by a migration script. This script has two functions called upgrade() and downgrade(). The upgrade() function applies the database changes that are part of the migration, and the downgrade() function removes them. This ability to add and remove changes means, Alembic can reconfigure a database to any point in the change history.
Alembic migrations can be created manually or automatically using the revision and migrate commands, respectively. A manual migration creates a migration skeleton script with empty upgrade() and downgrade() functions that need to be implemented by the developer using directives exposed by Alembic’s Operations object. An automatic migration attempts to generate the code for the upgrade() and downgrade() functions by looking for differences between the model definitions and the current state of the database.
Caution
Automatic migrations are not always accurate and can miss some details that are ambiguous. For example, if a column is renamed, an automatically generated migration may show that the column in question was deleted and a new column was added with the new name. Leaving the migration as is will cause the data in this column to be lost! For this reason, migration scripts generated automatically should always be reviewed and manually corrected if they have any inaccuracies.
To make changes to your database schema with Flask-Migrate, the following procedure needs to be followed:
- Make the necessary changes to the model classes.
- Create an automatic migration script with the
flask db migratecommand. - Review the generated script and adjust it so that it accurately represents the changes that were made to the models.
- Add the migration script to source control.
- Apply the migration to the database with the
flask db upgradecommand.
The flask db migrate subcommand creates an automatic migration script:
If you are following the git checkout instructions to incrementally update the example application, you do not need to issue the migrate commands, as the migration scripts are already incorporated into the Git repository tags.
Tip
If you have cloned the application’s Git repository on GitHub, you can run git checkout 5d to check out this version of the application. Note that you do not need to generate the migration repository and the migration scripts for this application as these are included in the GitHub repository.
Upgrading the Database
Once a migration script has been reviewed and accepted, it can be applied to the database using the flask db upgrade command:
For a first migration, this is effectively equivalent to calling db.create_all(), but in successive migrations the flask db upgrade command applies updates to the tables without affecting their contents.
Tip
If you have been working with the application in its previous stages, you already have a database file that was created with the db.create_all() function earlier. In this state, the flask db upgrade will fail because it will try to create database tables that already exist. A simple way to address this problem is to delete your data.sqlite database file and then run flask db upgrade to generate a new database through the migration framework. Another option is to skip the flask db upgrade and instead mark the existing database as upgraded using the flask db stamp command.
Adding More Migrations
As you work on your own projects, you are going to find that you need to make changes to your database models very often. When you manage the database through a migration framework, all changes must be defined in migration scripts, because anything that is not tracked in a migration will not be repeatable. The procedure to introduce a change in the database is similar to what was done to introduce the first migration:
- Make the necessary changes in the database models.
- Generate a migration with the
flask db migratecommand. - Review the generated migration script and correct it if it has any inaccuracies.
- Apply the changes to the database with the
flask db upgradecommand.
While working on a specific feature, you may find that you need to make several changes to your database models before you get them the way you want them. If your last migration has not been committed to source control yet, you can opt to expand it to incorporate new changes as you make them, and this will save you from having lots of very small migration scripts that are meaningless on their own. The procedure to expand the last migration script is as follows:
- Remove the last migration from the database with the
flask db downgradecommand (note that this may cause some data to be lost). - Delete the last migration script, which is now orphaned.
- Generate a new database migration with the
flask db migratecommand, which will now include the changes in the migration script you just removed, plus any other changes you’ve made to the models. - Review and apply the migration script as described previously.
The topic of database design and usage is very important; entire books have been written on the subject. You should consider this chapter as an overview; more advanced topics will be discussed in later chapters. The next chapter is dedicated to sending email.
Table of contents collapsed