
Socially aware web applications allow users to connect with other users. Different applications call these relationships followers, friends, contacts, connections, or buddies, but the feature is the same regardless of the name, and in all cases involves keeping track of directional links between pairs of users and using these links in database queries.
In this chapter, you will learn how to implement a follower feature for Flasky. Users will be able to “follow” other users and choose to filter the blog post list on the home page to include only those from the users they follow.
As discussed in Chapter 5, databases establish links between records using relationships. The one-to-many relationship is the most common type of relationship, where a record is linked with a list of related records. To implement this type of relationship, the elements on the “many” side have a foreign key that points to the linked element on the “one” side. The example application in its current state includes two one-to-many relationships: one that links user roles to lists of users and another that links users to the blog posts they authored.
Most other relationship types can be derived from the one-to-many type. The many-to-one relationship is a one-to-many looked at from the point of view of the “many” side. The one-to-one relationship type is a simplification of the one-to-many, where the “many” side is constrained to have at most one element. The only relationship type that cannot be implemented as a simple variation of the one-to-many model is the many-to-many, which has lists of elements on both sides. This relationship is described in detail in the following section.
The one-to-many, many-to-one, and one-to-one relationships all have at least one side with a single entity, so the links between related records are implemented with foreign keys pointing to that one element. But how do you implement a relationship where both sides are “many” sides?
Consider the classic example of a many-to-many relationship: a database of students and the classes they are taking. Clearly, you can’t add a foreign key to a class in the students table, because a student takes many classes—one foreign key is not enough. Likewise, you cannot add a foreign key to a student in the classes table, because classes have more than one student. Both sides need a list of foreign keys.
The solution is to add a third table to the database, called an association table. Now the many-to-many relationship can be decomposed into two one-to-many relationships from each of the two original tables to the association table. Figure 12-1 shows how the many-to-many relationship between students and classes is represented.
Many-to-many relationship example.
The association table in this example is called registrations. Each row in this table represents an individual registration of a student in a class.
Querying a many-to-many relationship is a two-step process. To obtain the list of classes a student is taking, you start from the one-to-many relationship between students and registrations and get the list of registrations for the desired student. Then the one-to-many relationship between classes and registrations is traversed in the many-to-one direction to obtain all the classes associated with the registrations retrieved for the student. Likewise, to find all the students in a class, you start from the class and get a list of registrations, then get the students linked to those registrations.
Traversing two relationships to obtain query results sounds difficult, but for a simple relationship like the one in the previous example, SQLAlchemy does most of the work. Following is the code that represents the many-to-many relationship in Figure 12-1:
The relationship is defined with the same db.relationship() construct that is used for one-to-many relationships, but in the case of a many-to-many relationship the additional secondary argument must be set to the association table. The relationship can be defined in either one of the two classes, with the backref argument taking care of exposing the relationship from the other side as well. The association table is defined as a simple table, not as a model, since SQLAlchemy manages this table internally.
The classes relationship uses list semantics, which makes working with a many-to-many relationship configured in this way extremely easy. Given a student s and a class c, the code that registers the student for the class is:
The queries that list the classes student s is registered for and the list of students registered for class c are also very simple:
The students relationship available in the Class model is the one defined in the db.backref() argument. Note that in this relationship the backref argument was expanded to also have a lazy='dynamic' attribute, so both sides return a query that can accept additional filters.
If student s later decides to drop class c, you can update the database as follows:
A many-to-many relationship can be used to model users following other users, but there is a problem. In the example of students and classes, there were two very clearly defined entities linked together by the association table. However, to represent users following other users, it is just users—there is no second entity.
A relationship in which both sides belong to the same table is said to be self-referential. In this case the entities on the left side of the relationship are users, which can be called the “followers.” The entities on the right side are also users, but these are the “followed” users. Conceptually, self-referential relationships are no different than regular relationships, but they are harder to think about. Figure 12-2 shows a database diagram for a self-referential relationship that represents users following other users.
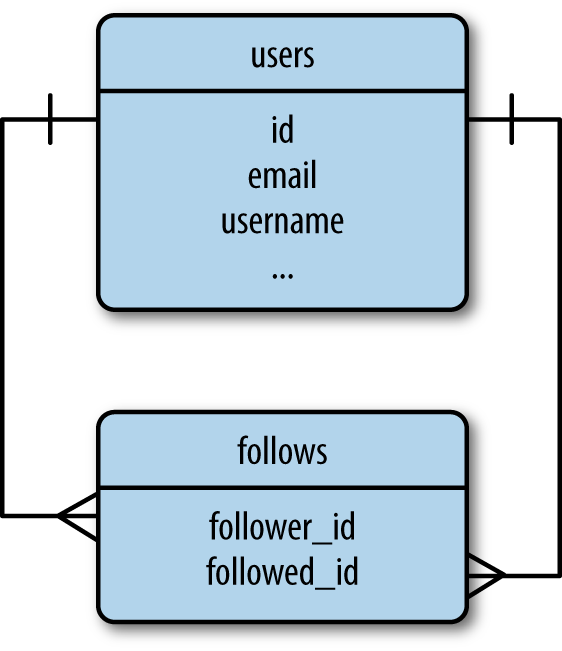
Followers many-to-many relationship.
The association table in this case is called follows. Each row in this table represents a user following another user. The one-to-many relationship pictured on the left side associates users with the list of “follows” rows in which they are the followers. The one-to-many relationship pictured on the right side associates users with the list of “follows” rows in which they are the followed user.
With a self-referential many-to-many relationship configured as shown in the previous example, the database can represent followers—but there is one limitation. A common need when working with many-to-many relationships is to store additional data that applies to the link between two entities. For the followers relationship, it can be useful to store the date a user started following another user, as that will enable lists of followers to be presented in chronological order. The only place this information can be stored is in the association table, but in an implementation similar to that of the students and classes shown earlier, the association table is an internal table that is fully managed by SQLAlchemy.
To be able to work with custom data in the relationship, the association table must be promoted to a proper model that the application can access. Example 12-1 shows the new association table, represented by the Follow model.
SQLAlchemy cannot use the association table transparently because that will not give the application access to the custom fields in it. Instead, the many-to-many relationship must be decomposed into the two basic one-to-many relationships for the left and right sides, and these must be defined as standard relationships. This is shown in Example 12-2.
Here the followed and followers relationships are defined as individual one-to-many relationships. Note that it is necessary to eliminate any ambiguity between foreign keys by specifying in each relationship which foreign key to use through the foreign_keys optional argument. The db.backref() arguments in these relationships do not apply to each other; the back references are applied to the Follow model.
The lazy argument for the back references is specified as joined. This lazy mode causes the related object to be loaded immediately from the join query. For example, if a user is following 100 other users, calling user.followed.all() will return a list of 100 Follow instances, where each one has the follower and followed back reference properties set to the respective users. The lazy='joined' mode enables this all to happen from a single database query. If lazy is set to the default value of select, then the follower and followed users are loaded lazily when they are first accessed and each attribute will require an individual query, which means that obtaining the complete list of followed users would require 100 additional database queries.
The lazy argument on the User side of both relationships has different needs. These are on the “one” side and return the “many” side; here a mode of dynamic is used, so that the relationship attributes return query objects instead of returning the items directly. This allows additional filters to be added to the query before it is executed.
The cascade argument configures how actions performed on a parent object propagate to related objects. An example of a cascade option is the rule that says that when an object is added to the database session, any objects associated with it through relationships should automatically be added to the session as well. The default cascade options are appropriate for most situations, but there is one case in which the default cascade options do not work well for this many-to-many relationship. The default cascade behavior when an object is deleted is to set the foreign key in any related objects that link to it to a null value. But for an association table, the correct behavior is to delete the entries that point to a record that was deleted, as this effectively destroys the link. This is what the delete-orphan cascade option does.
The value given to cascade is a comma-separated list of cascade options. This is somewhat confusing, but the option named all represents all the cascade options except delete-orphan. Using the value all, delete-orphan leaves the default cascade options enabled and adds the delete behavior for orphans.
The application now needs to work with the two one-to-many relationships to implement the many-to-many functionality. Since these are operations that will need to be repeated often, it is a good idea to create helper methods in the User model for all the possible operations. The four new methods that control this relationship are shown in Example 12-3.
The follow() method manually inserts a Follow instance in the association table that links a follower with a followed user, giving the application the opportunity to set the custom field. The two users who are connecting are manually assigned to the new Follow instance in its constructor, and then the object is added to the database session as usual. Note that there is no need to manually set the timestamp field because it was defined with a default value that sets the current date and time. The unfollow() method uses the followed relationship to locate the Follow instance that links the user to the followed user who needs to be disconnected. To destroy the link between the two users, the Follow object is simply deleted. The is_following() and is_followed_by() methods search the left- and right-side one-to-many relationships, respectively, for the given user and return True if the user is found. Both ensure that the given user has been assigned an id before issuing a query, to avoid errors if a user that has been created but not committed to the database yet is provided.
If you have cloned the application’s Git repository on GitHub, you can run git checkout 12a to check out this version of the application. This update contains a database migration, so remember to run flask db upgrade after you check out the code.
The database part of this feature is now complete. You can find a unit test that exercises the new database relationship in the source code repository on GitHub.
The profile page of a user needs to present a “Follow” button if the user viewing it is not a follower, or an “Unfollow” button if the user is a follower. It is also a nice addition to show the follower and followed counts, display the lists of followers and followed users, and show a “Follows you” sign when appropriate. The changes to the user profile template are shown in Example 12-4. Figure 12-3 shows how the additions look on the profile page.
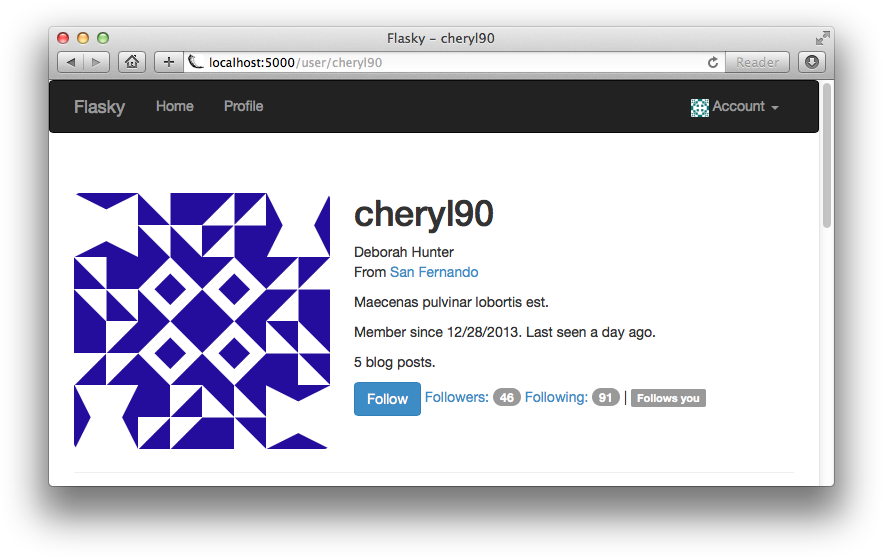
Followers on the profile page
There are four new endpoints defined in these template changes. The /follow/ route is invoked when a user clicks the “Follow” button on another user’s profile page. The implementation is shown in Example 12-5. This view function loads the requested user, verifies that it is valid and that it isn’t already followed by the logged-in user, and then calls thefollow() helper function in the User model to establish the link. The /unfollow/ route is implemented in a similar way. The /followers/ route is invoked when a user clicks another user’s follower count on the profile page. The implementation is shown in Example 12-6. This function loads and validates the requested user, then paginates its followers relationship using the same techniques learned in Chapter 11. Because the query for followers returns Follow instances, the list is converted into another list that has user and timestamp fields in each entry so that rendering is simpler.
The template that renders the follower list can be written generically so that it can be used for lists of followers and followed users. The template receives the user, a title for the page, the endpoint to use in the pagination links, the pagination object, and the list of results.
The followed_by endpoint is almost identical. The only difference is that the list of users is obtained from the user.followed relationship. The template arguments are also adjusted accordingly.
The followers.html template is implemented with a two-column table that shows usernames and their avatars on the left and Flask-Moment timestamps on the right. You can consult the source code repository on GitHub to study the implementation in detail.
If you have cloned the application’s Git repository on GitHub, you can run git checkout 12b to check out this version of the application.
The application’s home page currently shows all the posts in the database in descending chronological order. With the followers feature now complete, it would be a nice addition to give users the option to view blog posts from only the users they follow.
The obvious way to load all the posts authored by followed users is to first get the list of those users and then get the posts from each and sort them into a single list. Of course, that approach does not scale well; the effort required to obtain this combined list will grow as the database grows, and operations such as pagination cannot be done efficiently. This problem is commonly known as the “ N +1 problem,” because working with the database in this way requires issuing N +1 database queries, with N being the number of results returned by the first query. The key to obtaining the blog posts with good performance regardless of the database size is doing it all with a single query.
The database operation that can do this is called a join. A join operation takes two or more tables and finds all the combinations of rows that satisfy a given condition. The resulting combined rows are inserted into a temporary table that is the result of the join. The best way to explain how joins work is through an example.
Table 12-1 shows an example users table with three users.
| id | username |
|---|---|
| 1 | john |
| 2 | susan |
| 3 | david |
Table 12-2 shows the corresponding posts table, with some blog posts.
| id | author_id | body |
|---|---|---|
| 1 | 2 | Blog post by susan |
| 2 | 1 | Blog post by john |
| 3 | 3 | Blog post by david |
| 4 | 1 | Second blog post by john |
Finally, Table 12-3 shows who is following whom. In this table you can see that john is following david, susan is following john and david, and david is not following anyone.
| follower_id | followed_id |
|---|---|
| 1 | 3 |
| 2 | 1 |
| 2 | 3 |
To obtain the list of posts by users followed by the user susan, the posts and follows tables must be combined. First the follows table is filtered to keep just the rows that have susan as the follower, which in this example are the last two rows. Then a temporary join table is created from all the possible combinations of rows from the posts and filtered follows tables in which the author_id of the post is the same as the followed_id of the follow, effectively selecting any posts that appear in the list of users susan is following. Table 12-4 shows the result of the join operation. The columns that were used to perform the join are marked with an * in this table.
| id | author_id* | body | follower_id | followed_id* |
|---|---|---|---|---|
| 2 | 1 | Blog post by john | 2 | 1 |
| 3 | 3 | Blog post by david | 2 | 3 |
| 4 | 1 | Second blog post by john | 2 | 1 |
This table contains exactly the list of blog posts authored by users that susan is following. The Flask-SQLAlchemy query that performs the join operation as described is fairly complex:
All the queries that you have seen so far start from the query attribute of the model that is queried. That format does not work well for this query, because the query needs to return posts rows, yet the first operation that needs to be done is to apply a filter to the follows table. So, a more basic form of the query is used instead. To fully understand this query, each part should be looked at individually:
db.session.query(Post) specifies that this is going to be a query that returns Post objects.select_from(Follow) says that the query begins with the Follow model.filter_by(follower_id=self.id) performs the filtering of the follows table by the follower user.join(Post, Follow.followed_id == Post.author_id) joins the results of filter_by() with the Post objects.The query can be simplified by swapping the order of the filter and the join:
Issuing the join operation first means the query can be started from Post.query, so now the only two filters that need to be applied are join() and filter(). It may seem that doing the join first and then the filtering would be more work, but in reality these two queries are equivalent. SQLAlchemy first collects all the filters and then generates the query in the most efficient way. The native SQL instructions for these two queries are nearly identical, something that you can confirm by printing the query object converted to a string (i.e., print(str(query))). The final version of this query is added to the Post model, as shown in Example 12-7.
Note that the followed_posts() method is defined as a property so that it does not need the (). That way, all relationships have a consistent syntax.
If you have cloned the application’s Git repository on GitHub, you can run git checkout 12c to check out this version of the application.
Joins are extremely hard to wrap your head around; you may need to experiment with the example code in a shell before it all sinks in.
The home page can now give users the choice to view all blog posts or just those from followed users.Example 12-8 shows how this choice is implemented.
The choice of showing all or followed posts is stored in a cookie called show_followed that, when set to a nonempty string, indicates that only followed posts should be shown. Cookies are stored in the request object as a request.cookies dictionary. The string value of the cookie is converted to a Boolean, and based on its value a query local variable is set to the query that obtains the complete or filtered list of blog posts. To show all the posts, the top-level query Post.query is used, and the recently added User.followed_posts property is used when the list should be restricted to followed users. The query stored in the query local variable is then paginated and the results sent to the template as before.
The show_followed cookie is set in two new routes, shown in Example 12-9.
Links to these routes are added to the home page template. When they are invoked, the show_followed cookie is set to the proper value and a redirect back to the home page is issued.
Cookies can be set only on a response object, so these routes need to create a response object through make_response() instead of letting Flask do this.
The set_cookie() function takes the cookie name and the value as the first two arguments. The max_age optional argument sets the number of seconds until the cookie expires. Not including this argument makes the cookie expire when the browser window is closed. In this case, a maximum age of 30 days is set so that the setting is remembered even if the user does not return to the application for several days.
The changes to the template add two navigation tabs at the top of the page that invoke the /all or /followed routes to set the correct settings in the session. You can inspect the template changes in detail in the source code repository on GitHub. Figure 12-4 shows how the home page looks with these changes.
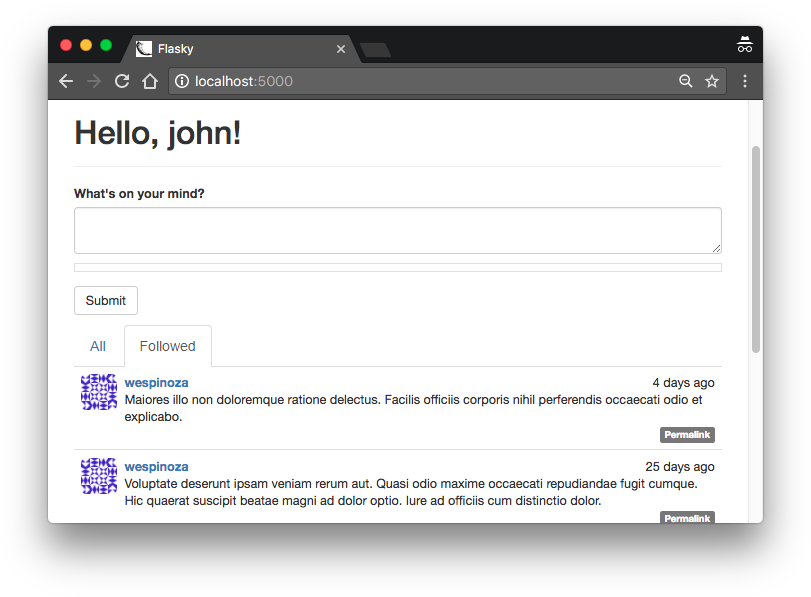
Followed posts on the home page
If you have cloned the application’s Git repository on GitHub, you can run git checkout 12d to check out this version of the application.
If you try the application at this point and switch to the followed list of posts, you will notice that your own posts do not appear in the list. This is of course correct, because users are not followers of themselves.
Even though the queries are working as designed, most users will expect to see their own posts when they are looking at those of their friends. The easiest way to address this issue is to register all users as their own followers at the time they are created. This trick is shown in Example 12-10.
Unfortunately, you likely have several users in the database who are already created and are not following themselves. If the database is small and easy to regenerate, then it can be deleted and re-created, but if that is not an option, then adding an update function that fixes existing users is the proper solution. This is shown in Example 12-11.
Now the database can be updated by running the previous example function from the shell:
Creating functions that introduce updates to the database is a common technique used to update applications that are deployed, as running a scripted update is less error prone than updating databases manually. In Chapter 17 you will see how this function and others like it can be incorporated into a deployment script.
Making all users self-followers makes the application more usable, but this change introduces a few complications. The follower and followed user counts shown in the user profile page are now increased by one due to the self-follower links. The numbers need to be decreased by one to be accurate, which is easy to do directly in the template by rendering {{ user.followers.count() - 1 }} and {{ user.followed.count() - 1 }}. The lists of followers and followed users also must be adjusted to not show the same user, another simple task to do in the template with a conditional. Finally, any unit tests that check follower counts are also affected by the self-follower links and must be adjusted to account for the self-followers.
If you have cloned the application’s Git repository on GitHub, you can run git checkout 12e to check out this version of the application.
In the next chapter, the user comment subsystem will be implemented—another very important feature of socially aware applications.
Table of contents collapsed
Select a result to preview