User Profiles
Chapter 10. User Profiles
In this chapter, user profiles for Flasky are implemented. All socially aware sites give their users a profile page, where a summary of the user’s participation in the website is presented. Users can advertise their presence on the website by sharing the URL to their profile page, so it is important that the URLs be short and easy to remember.
Profile Information
To make user profile pages more interesting, some additional information about users can be stored in the database. In Example 10-1 the User model is extended with several new fields.
Example 10-1. app/models.py: user information fields
The new fields store the user’s real name, location, self-written bio, date of registration, and date of last visit. The about_me field is assigned the type db.Text(). The difference between db.String and db.Text is that db.Text is a variable-length field and as such does not need a maximum length.
The two timestamps are given a default value of the current time. Note that the datetime.utcnow is missing the () at the end. This is because the default argument in db.Column() can take a function as a value. Each time a default value needs to be generated, SQLAlchemy invokes the function to produce it. This default value is all that is needed to manage the member_since field.
The last_seen field is also initialized to the current time upon creation, but it needs to be refreshed each time the user accesses the site. A method in the User class can be added to perform this update. This is shown in Example 10-2.
Example 10-2. app/models.py: refreshing a user’s last visit time
To keep the last visit date for all users updated, the ping() method must be called each time a request from a user is received. Because the before_app_request handler in the auth blueprint runs before every request, it can do this easily, as shown in Example 10-3.
Example 10-3. app/auth/views.py: pinging the logged-in user
User Profile Page
Creating a profile page for each user does not present any new challenges.Example 10-4 shows the route definition.
Example 10-4. app/main/views.py: profile page route
This route is added in the main blueprint. For a user named john, the profile page will be at http://localhost:5000/user/john. The username given in the URL is searched in the database and, if found, the user.html template is rendered with it as the argument. An invalid username sent into this route will cause a 404 error to be returned. With Flask-SQLAlchemy, the search and error cases can be nicely combined in a single statement using the first_or_404() method of the query object. The user.html template is going to need to present user information, so it receives the user object as an argument. An initial version of this template is shown in Example 10-5.
Example 10-5. app/templates/user.html: user profile template
This template has a few interesting implementation details:
- The
nameandlocationfields are rendered inside a single<p>element. A Jinja2 conditional ensures that the<p>element is created only when at least one of the fields is defined. - The user
locationfield is rendered as a link to a Google Maps query, so that clicking on it opens a map centered on the location. - If the logged-in user is an administrator, then the email address of the user is shown, rendered as a mailto link. This is useful when an administrator is viewing the profile page of another user and needs to contact the user.
- The two timestamps for the user are rendered to the page using Flask-Moment, as shown in Chapter 3.
As most users will want easy access to their own profile page, a link to it can be added to the navigation bar. The relevant changes to the base.html template are shown in Example 10-6.
Using a conditional for the profile page link is necessary because the navigation bar is also rendered for unauthenticated users, in which case the profile link is skipped. Figure 10-1 shows how the profile page looks in the browser. The new profile link in the navigation bar is also shown.
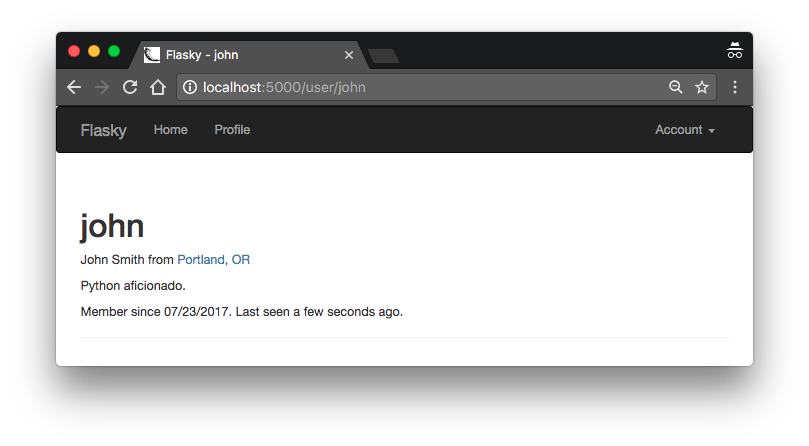
User profile page
Tip
If you have cloned the application’s Git repository on GitHub, you can run git checkout 10a to check out this version of the application. This update contains a database migration, so remember to run flask db upgrade after you check out the code.
Profile Editor
There are two different use cases related to editing of user profiles. The most obvious is that users need to have access to a page where they can enter information about themselves to present in their profile pages. A less obvious but also important requirement is to let administrators edit the profiles of other users—not only their personal information items but also other fields in the User model to which users have no direct access, such as the user role. Because the two profile editing requirements are substantially different, two different forms will be created.
User-Level Profile Editor
The profile editing form for regular users is shown in Example 10-7.
Example 10-7. app/main/forms.py: edit profile form
Note that as all the fields in this form are optional, the length validator allows a length of zero as a minimum. The route definition that uses this form is shown in Example 10-8.
As in previous forms, the data associated with each form field is available at form.<field-name>.data. This is useful not only to obtain values submitted by the user, but also to provide initial values that are shown to the user for editing. When form.validate_on_submit() is False, the three fields in this form are initialized from the corresponding fields in current_user. Then, when the form is submitted, the data attributes of the form fields contain the updated values, so these are moved back into the fields of the user object before the object is saved back to the database. Figure 10-2 shows the profile editing page.
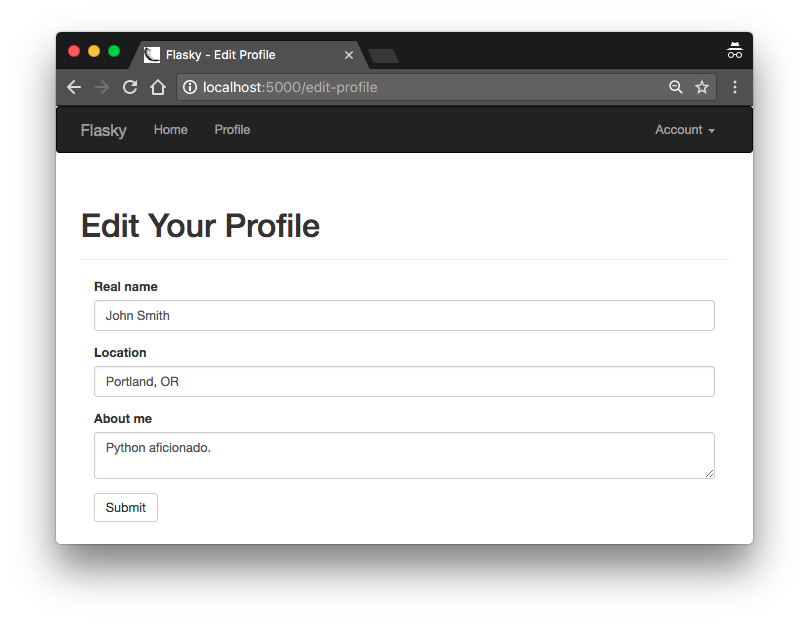
Profile editor
To make it easy for users to reach this page, a direct link can be added in the profile page, as shown in Example 10-9.
Example 10-9. app/templates/user.html: edit profile link
The conditional that encloses the link will make the link appear only when users are viewing their own profiles.
Administrator-Level Profile Editor
The profile editing form for administrators is more complex than the one for regular users. In addition to the three profile information fields, this form allows administrators to edit a user’s email, username, confirmed status, and role. The form is shown in Example 10-10.
Example 10-10. app/main/forms.py: profile editing form for administrators
class EditProfileAdminForm(FlaskForm):
email = StringField('Email', validators=[DataRequired(), Length(1, 64),
Email()])
username = StringField('Username', validators=[
DataRequired(), Length(1, 64),
Regexp('^[A-Za-z][A-Za-z0-9_.]*
The `SelectField` is WTForm’s wrapper for the `<select>` HTML form control, which implements a drop-down list, used in this form to select a user role. An instance of `SelectField` must have the items set in its `choices` attribute. They must be given as a list of tuples, with each tuple consisting of two values: an identifier for the item and the text to show in the control as a string. The `choices` list is set in the form’s constructor, with values obtained from the `Role` model with a query that sorts all the roles alphabetically by name. The identifier for each tuple is set to the `id` of each role, and since these are integers, a `coerce=int` argument is added to the `SelectField` constructor so that the field values are stored as integers instead of the default, which is strings.
The `email` and `username` fields are constructed in the same way as in the authentication forms, but their validation requires some careful handling. The validation condition used for both these fields must first check whether a change to the field was made, and only when there is a change should it ensure that the new value does not duplicate another user’s. When these fields are not changed, then validation should pass. To implement this logic, the form’s constructor receives the user object as an argument and saves it as a member variable, which is later used in the custom validation methods.
The route definition for the administrator’s profile editor is shown in [Example 10-11](https://learning.oreilly.com/library/view/flask-web-development/9781491991725/#ch15_admin_profile_edit_route).
This route has largely the same structure as the simpler one for regular users, but it includes the `admin_required` decorator created in [Chapter 9](https://learning.oreilly.com/library/view/flask-web-development/9781491991725/ch09.html#ch_roles), which will automatically return a 403 error for any users who are not administrators that try to use this route.
The user `id` is given as a dynamic argument in the URL, so Flask-SQLAlchemy’s `get_or_404()` convenience function can be used, knowing that if the `id` is invalid the request will return a code 404 error. The `SelectField` used for the user role also deserves to be studied. When setting the initial value for the field, the `role_id` is assigned to `field.role.data` because the list of tuples set in the `choices` attribute uses the numeric identifiers to reference each option. When the form is submitted, the `id` is extracted from the field’s `data` attribute and used in a query to load the selected role object by its `id` once again. The `coerce=int` argument used in the `SelectField` declaration in the form ensures that the `data` attribute of this field is always converted to an integer.
To link to this page, another button is added in the user profile page, as shown in [Example 10-12](https://learning.oreilly.com/library/view/flask-web-development/9781491991725/#ch15_admin_profile_page_link).
This button is rendered with a different Bootstrap style to call attention to it. The conditional that wraps it makes the button appear in profile pages only if the logged-in user has the administrator role.
###### Tip
If you have cloned the application’s Git repository on GitHub, you can run `git checkout 10b` to check out this version of the application.
## User Avatars
The look of the profile pages can be improved by showing avatar pictures of users. In this section, you will learn how to add user avatars provided by [Gravatar](https://gravatar.com/), the leading avatar service. Gravatar associates avatar images with email addresses. Users create an account at *[*https://gravatar.com*](https://gravatar.com/)* and then upload their images. The service exposes the user’s avatar through a specially crafted URL that includes the MD5 hash of the user’s email address, which can be calculated as follows:
The avatar URLs are then generated by appending the MD5 hash to the *https://secure.gravatar.com/avatar/* URL. For example, you can type *https://secure.gravatar.com/avatar/d4c74594d841139328695756648b6bd6* in your browser’s address bar to get the avatar image for the email address *john@example.com*, or a default avatar image if that email address does not have an avatar registered. After you build the basic avatar URL, a few query string arguments can be used to configure the characteristics of the avatar image, as described in [Table 10-1](https://learning.oreilly.com/library/view/flask-web-development/9781491991725/#ch15_gravatar_options).
| Argument name | Description |
| --- | --- |
| `s` | Image size, in pixels. |
| `r` | Image rating. Options are `"g"`, `"pg"`, `"r"`, and `"x"`. |
| `d` | The default image generator for users who have no avatars registered with the Gravatar service. Options are `"404"` to return a 404 error, a URL that points to a default image, or one of the following image generators: `"mm"`, `"identicon"`, `"monsterid"`, `"wavatar"`, `"retro"`, or `"blank"`. |
| `fd` | Force the use of default avatars. |
For example, adding *?d=identicon* to the avatar URL for *john@example.com* will generate a different default avatar that is based on geometric designs. All these options to generate avatar URLs can be added to the `User` model. The implementation is shown in [Example 10-13](https://learning.oreilly.com/library/view/flask-web-development/9781491991725/#ch15_gravatar_method).
##### Example 10-13. app/models.py: gravatar URL generation
The avatar URL is generated from the base URL, the MD5 hash of the user’s email address, and the arguments, all of which have default values. Note that one of the requirements of the Gravatar service is that the email address from which the MD5 hash is obtained is normalized to contain only lowercase alphabetical characters, so that conversion is also added to this method. With this implementation it is easy to generate avatar URLs in the Python shell:
The `gravatar()` method can also be invoked from Jinja2 templates.[Example 10-14](https://learning.oreilly.com/library/view/flask-web-development/9781491991725/#ch15_profile_gravatar) shows how a 256-pixel avatar can be added to the profile page.
The `profile-thumbnail` CSS class helps with the positioning of the image on the page. The `<div>` element that follows the image encapsulates the profile information and uses the `profile-header` CSS class to improve the formatting. You can see the definition of the CSS class in the GitHub repository for the application.
Using a similar approach, the base template adds a small thumbnail image of the logged-in user in the navigation bar. To better format the avatar pictures in the page, custom CSS classes are used. You can find these in the source code repository in a *styles.css* file added to the application’s static file folder and referenced from the *base.html* template. [Figure 10-3](https://learning.oreilly.com/library/view/flask-web-development/9781491991725/#ch12_profile_with_avatar) shows the user profile page with avatar.
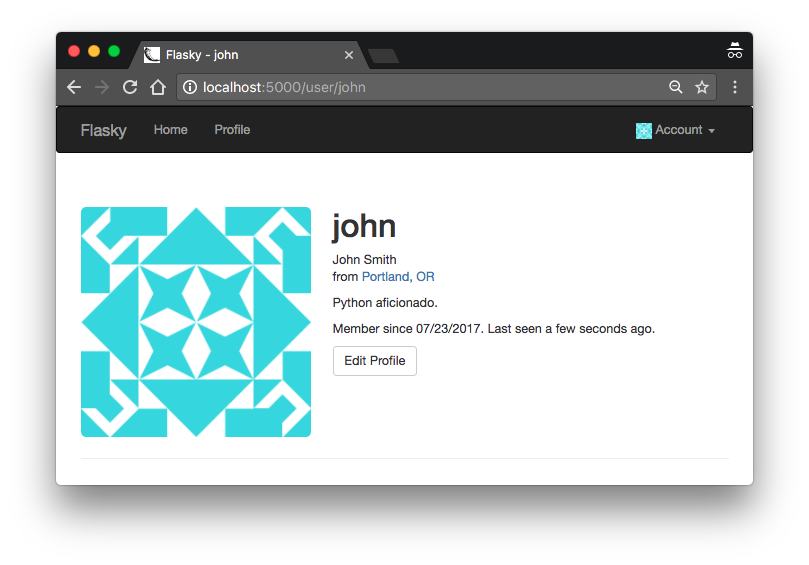
User profile page with avatar
###### Tip
If you have cloned the application’s Git repository on GitHub, you can run `git checkout 10c` to check out this version of the application.
The generation of avatars requires an MD5 hash to be generated, which is a CPU-intensive operation. If a large number of avatars need to be generated for a page, then the computational work can add up and become significant. Since the MD5 hash for a user will remain constant for as long as the email address stays the same, it can be *cached* in the `User` model. [Example 10-15](https://learning.oreilly.com/library/view/flask-web-development/9781491991725/#ch15_gravatar_method_caching) shows the changes to the `User` model to store the MD5 hashes in the database.
##### Example 10-15. app/models.py: gravatar URL generation with caching of MD5 hashes
To avoid duplicating the logic to compute the gravatar hash, a new method, `gravatar_hash()`, is added that performs this task. During model initialization, the hash is stored in the new `avatar_hash` model column. If the user updates the email address, then the hash is recalculated. The `gravatar()` method uses the stored hash if available, and if not, it generates a new hash as before.
###### Tip
If you have cloned the application’s Git repository on GitHub, you can run `git checkout 10d` to check out this version of the application. This update contains a database migration, so remember to run `flask db upgrade` after you check out the code.
In the next chapter, the blogging engine that powers this application will be created.
Table of contents collapsed, 0,
'Usernames must have only letters, numbers, dots or '
'underscores')])
confirmed = BooleanField('Confirmed')
role = SelectField('Role', coerce=int)
name = StringField('Real name', validators=[Length(0, 64)])
location = StringField('Location', validators=[Length(0, 64)])
about_me = TextAreaField('About me')
submit = SubmitField('Submit')
def __init__(self, user, *args, **kwargs):
super(EditProfileAdminForm, self).__init__(*args, **kwargs)
self.role.choices = [(role.id, role.name)
for role in Role.query.order_by(Role.name).all()]
self.user = user
def validate_email(self, field):
if field.data != self.user.email and \
User.query.filter_by(email=field.data).first():
raise ValidationError('Email already registered.')
def validate_username(self, field):
if field.data != self.user.username and \
User.query.filter_by(username=field.data).first():
raise ValidationError('Username already in use.')
The SelectField is WTForm’s wrapper for the <select> HTML form control, which implements a drop-down list, used in this form to select a user role. An instance of SelectField must have the items set in its choices attribute. They must be given as a list of tuples, with each tuple consisting of two values: an identifier for the item and the text to show in the control as a string. The choices list is set in the form’s constructor, with values obtained from the Role model with a query that sorts all the roles alphabetically by name. The identifier for each tuple is set to the id of each role, and since these are integers, a coerce=int argument is added to the SelectField constructor so that the field values are stored as integers instead of the default, which is strings.
The email and username fields are constructed in the same way as in the authentication forms, but their validation requires some careful handling. The validation condition used for both these fields must first check whether a change to the field was made, and only when there is a change should it ensure that the new value does not duplicate another user’s. When these fields are not changed, then validation should pass. To implement this logic, the form’s constructor receives the user object as an argument and saves it as a member variable, which is later used in the custom validation methods.
The route definition for the administrator’s profile editor is shown in Example 10-11.
This route has largely the same structure as the simpler one for regular users, but it includes the admin_required decorator created in Chapter 9, which will automatically return a 403 error for any users who are not administrators that try to use this route.
The user id is given as a dynamic argument in the URL, so Flask-SQLAlchemy’s get_or_404() convenience function can be used, knowing that if the id is invalid the request will return a code 404 error. The SelectField used for the user role also deserves to be studied. When setting the initial value for the field, the role_id is assigned to field.role.data because the list of tuples set in the choices attribute uses the numeric identifiers to reference each option. When the form is submitted, the id is extracted from the field’s data attribute and used in a query to load the selected role object by its id once again. The coerce=int argument used in the SelectField declaration in the form ensures that the data attribute of this field is always converted to an integer.
To link to this page, another button is added in the user profile page, as shown in Example 10-12.
This button is rendered with a different Bootstrap style to call attention to it. The conditional that wraps it makes the button appear in profile pages only if the logged-in user has the administrator role.
Tip
If you have cloned the application’s Git repository on GitHub, you can run git checkout 10b to check out this version of the application.
User Avatars
The look of the profile pages can be improved by showing avatar pictures of users. In this section, you will learn how to add user avatars provided by Gravatar, the leading avatar service. Gravatar associates avatar images with email addresses. Users create an account at https://gravatar.com and then upload their images. The service exposes the user’s avatar through a specially crafted URL that includes the MD5 hash of the user’s email address, which can be calculated as follows:
The avatar URLs are then generated by appending the MD5 hash to the https://secure.gravatar.com/avatar/ URL. For example, you can type https://secure.gravatar.com/avatar/d4c74594d841139328695756648b6bd6 in your browser’s address bar to get the avatar image for the email address john@example.com, or a default avatar image if that email address does not have an avatar registered. After you build the basic avatar URL, a few query string arguments can be used to configure the characteristics of the avatar image, as described in Table 10-1.
| Argument name | Description |
|---|---|
s | Image size, in pixels. |
r | Image rating. Options are "g", "pg", "r", and "x". |
d | The default image generator for users who have no avatars registered with the Gravatar service. Options are "404" to return a 404 error, a URL that points to a default image, or one of the following image generators: "mm", "identicon", "monsterid", "wavatar", "retro", or "blank". |
fd | Force the use of default avatars. |
For example, adding ?d=identicon to the avatar URL for john@example.com will generate a different default avatar that is based on geometric designs. All these options to generate avatar URLs can be added to the User model. The implementation is shown in Example 10-13.
Example 10-13. app/models.py: gravatar URL generation
The avatar URL is generated from the base URL, the MD5 hash of the user’s email address, and the arguments, all of which have default values. Note that one of the requirements of the Gravatar service is that the email address from which the MD5 hash is obtained is normalized to contain only lowercase alphabetical characters, so that conversion is also added to this method. With this implementation it is easy to generate avatar URLs in the Python shell:
The gravatar() method can also be invoked from Jinja2 templates.Example 10-14 shows how a 256-pixel avatar can be added to the profile page.
The profile-thumbnail CSS class helps with the positioning of the image on the page. The <div> element that follows the image encapsulates the profile information and uses the profile-header CSS class to improve the formatting. You can see the definition of the CSS class in the GitHub repository for the application.
Using a similar approach, the base template adds a small thumbnail image of the logged-in user in the navigation bar. To better format the avatar pictures in the page, custom CSS classes are used. You can find these in the source code repository in a styles.css file added to the application’s static file folder and referenced from the base.html template. Figure 10-3 shows the user profile page with avatar.

User profile page with avatar
Tip
If you have cloned the application’s Git repository on GitHub, you can run git checkout 10c to check out this version of the application.
The generation of avatars requires an MD5 hash to be generated, which is a CPU-intensive operation. If a large number of avatars need to be generated for a page, then the computational work can add up and become significant. Since the MD5 hash for a user will remain constant for as long as the email address stays the same, it can be cached in the User model. Example 10-15 shows the changes to the User model to store the MD5 hashes in the database.
Example 10-15. app/models.py: gravatar URL generation with caching of MD5 hashes
To avoid duplicating the logic to compute the gravatar hash, a new method, gravatar_hash(), is added that performs this task. During model initialization, the hash is stored in the new avatar_hash model column. If the user updates the email address, then the hash is recalculated. The gravatar() method uses the stored hash if available, and if not, it generates a new hash as before.
Tip
If you have cloned the application’s Git repository on GitHub, you can run git checkout 10d to check out this version of the application. This update contains a database migration, so remember to run flask db upgrade after you check out the code.
In the next chapter, the blogging engine that powers this application will be created.
Table of contents collapsed