Templates
Chapter 3. Templates
The key to writing applications that are easy to maintain is to write clean and well-structured code. The examples that you have seen so far are too simple to demonstrate this, but Flask view functions have two completely independent purposes disguised as one, which creates a problem.
The obvious task of a view function is to generate a response to a request, as you have seen in the examples shown in Chapter 2. For the simplest requests this is enough, but in many cases a request also triggers a change in the state of the application, and the view function is where this change is generated.
For example, consider a user who is registering a new account on a website. The user types an email address and a password in a web form and clicks the Submit button. On the server, a request with the data provided by the user arrives, and Flask dispatches it to the view function that handles registration requests. This view function needs to talk to the database to get the new user added, and then generate a response to send back to the browser that includes a success or failure message. These two types of tasks are formally called business logic and presentation logic, respectively.
Mixing business and presentation logic leads to code that is hard to understand and maintain. Imagine having to build the HTML code for a large table by concatenating data obtained from the database with the necessary HTML string literals. Moving the presentation logic into templates helps improve the maintainability of the application.
A template is a file that contains the text of a response, with placeholder variables for the dynamic parts that will be known only in the context of a request. The process that replaces the variables with actual values and returns a final response string is called rendering. For the task of rendering templates, Flask uses a powerful template engine called Jinja2.
The Jinja2 Template Engine
In its simplest form, a Jinja2 template is a file that contains the text of a response. Example 3-1 shows a Jinja2 template that matches the response of the index() view function of Example 2-1.
Example 3-1. templates/index.html: Jinja2 template
<h1>Hello World!</h1>
The response returned by the user() view function of Example 2-2 has a dynamic component, which is represented by a variable. Example 3-2 shows the template that implements this response.
Example 3-2. templates/user.html: Jinja2 template
Rendering Templates
By default Flask looks for templates in a templates subdirectory located inside the main application directory. For the next version of hello.py, you need to create the templates subdirectory and store the templates defined in the previous examples in it as index.html and user.html, respectively.
The view functions in the application need to be modified to render these templates. Example 3-3 shows these changes.
Example 3-3. hello.py: rendering a template
The function render_template() provided by Flask integrates the Jinja2 template engine with the application. This function takes the filename of the template as its first argument. Any additional arguments are key-value pairs that represent actual values for variables referenced in the template. In this example, the second template is receiving a name variable.
Keyword arguments like name=name in the previous example are fairly common, but they may seem confusing and hard to understand if you are not used to them. The “name” on the left side represents the argument name, which is used in the placeholder written in the template. The “name” on the right side is a variable in the current scope that provides the value for the argument of the same name. While this is a common pattern, using the same variable name on both sides is not required.
Tip
If you have cloned the application’s Git repository on GitHub, you can run git checkout 3a to check out this version of the application.
Variables
The {{ name }} construct used in the template shown in Example 3-2 references a variable, a special placeholder that tells the template engine that the value that goes in that place should be obtained from data provided at the time the template is rendered.
Jinja2 recognizes variables of any type, even complex types such as lists, dictionaries, and objects. The following are some more examples of variables used in templates:
Variables can be modified with filters, which are added after the variable name with a pipe character as separator. For example, the following template shows the name variable capitalized:
Table 3-1 lists some of the commonly used filters that come with Jinja2.
| Filter name | Description |
|---|---|
safe | Renders the value without applying escaping |
capitalize | Converts the first character of the value to uppercase and the rest to lowercase |
lower | Converts the value to lowercase characters |
upper | Converts the value to uppercase characters |
title | Capitalizes each word in the value |
trim | Removes leading and trailing whitespace from the value |
striptags | Removes any HTML tags from the value before rendering |
The safe filter is interesting to highlight. By default Jinja2 escapes all variables for security purposes. For example, if a variable is set to the value '<h1>Hello</h1>', Jinja2 will render the string as '<h1>Hello</h1>', which will cause the h1 element to be displayed and not interpreted by the browser. Many times it is necessary to display HTML code stored in variables, and for those cases the safe filter is used.
Caution
Never use the safe filter on values that aren’t trusted, such as text entered by users on web forms.
The complete list of filters can be obtained from the official Jinja2 documentation.
Control Structures
Jinja2 offers several control structures that can be used to alter the flow of the template. This section introduces some of the most useful ones with simple examples.
The following example shows how conditional statements can be entered in a template:
Another common need in templates is to render a list of elements. This example shows how this can be done with a for loop:
Jinja2 also supports macros, which are similar to functions in Python code. For example:
To make macros more reusable, they can be stored in standalone files that are then imported from all the templates that need them:
Portions of template code that need to be repeated in several places can be stored in a separate file and included from all the templates to avoid repetition:
Yet another powerful way to reuse is through template inheritance, which is similar to class inheritance in Python code. First, a base template is created with the name base.html:
Base templates define blocks that can be overridden by derived templates. The Jinja2 block and endblock directives define blocks of content that are added to the base template. In this example, there are blocks called head, title, and body; note that title is contained by head. The following example is a derived template of the base template:
The extends directive declares that this template derives from base.html. This directive is followed by new definitions for the three blocks defined in the base template, which are inserted in the proper places. When a block has some content in both the base and derived templates, the content from the derived template is used. Within this block, the derived template can call super() to reference the contents of the block in the base template. In the preceding example, this is done in the head block.
Real-world usage of all the control structures presented in this section will be shown later, so you will have the opportunity to see how they work.
Bootstrap Integration with Flask-Bootstrap
Bootstrap is an open-source web browser framework from Twitter that provides user interface components that help create clean and attractive web pages that are compatible with all modern web browsers used on desktop and mobile platforms.
Bootstrap is a client-side framework, so the server is not directly involved with it. All the server needs to do is provide HTML responses that reference Bootstrap’s Cascading Style Sheets (CSS) and JavaScript files, and instantiate the desired user interface elements through HTML, CSS, and JavaScript code. The ideal place to do all this is in templates.
The naive approach to integrating Bootstrap with the application is to make all the necessary changes to the HTML templates, following the recommendations given by the Bootstrap documentation. But this is an area where the use of a Flask extension makes an integration task much simpler, while helping keep these changes nicely organized.
The extension is called Flask-Bootstrap, and it can be installed with pip:
Flask extensions are initialized at the same time the application instance is created. Example 3-4 shows the initialization of Flask-Bootstrap.
Example 3-4. hello.py: Flask-Bootstrap initialization
The extension is usually imported from a flask_<name> package, where <name> is the extension name. Most Flask extensions follow one of two consistent patterns for initialization. In Example 3-4, the extension is initialized by passing the application instance as an argument in the constructor. You will learn about a more advanced method to initialize extensions appropriate for larger applications in Chapter 7.
Once Flask-Bootstrap is initialized, a base template that includes all the Bootstrap files and general structure is available to the application. The application then takes advantage of Jinja2’s template inheritance to extend this base template. Example 3-5 shows a new version of user.html as a derived template.
The Jinja2 extends directive implements the template inheritance by referencing bootstrap/base.html from Flask-Bootstrap. The base template from Flask-Bootstrap provides a skeleton web page that includes all the Bootstrap CSS and JavaScript files.
The user.html template defines three blocks called title, navbar, and content. These are all blocks that the base template exports for derived templates to define. The title block is straightforward; its contents will appear between <title> tags in the header of the rendered HTML document. The navbar and content blocks are reserved for the page navigation bar and main content.
In this template, the navbar block defines a simple navigation bar using Bootstrap components. The content block has a container <div> with a page header inside. The greeting line that was in the previous version of the template is now inside the page header. Figure 3-1 shows how the application looks with these changes.
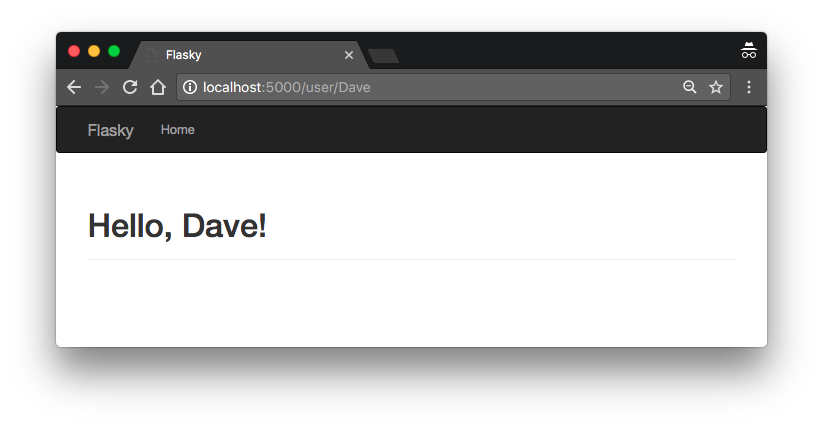
Twitter Bootstrap templates
Tip
If you have cloned the application’s Git repository on GitHub, you can run git checkout 3b to check out this version of the application. The Flask-Bootstrap package also needs to be installed in your virtual environment. The Bootstrap official documentation is a great learning resource full of copy/paste-ready examples.
Flask-Bootstrap’s base.html template defines several other blocks that can be used in derived templates. Table 3-2 shows the complete list of available blocks.
| Block name | Description |
|---|---|
doc | The entire HTML document |
html_attribs | Attributes inside the <html> tag |
html | The contents of the <html> tag |
head | The contents of the <head> tag |
title | The contents of the <title> tag |
metas | The list of <meta> tags |
styles | CSS definitions |
body_attribs | Attributes inside the <body> tag |
body | The contents of the <body> tag |
navbar | User-defined navigation bar |
content | User-defined page content |
scripts | JavaScript declarations at the bottom of the document |
Many of the blocks in Table 3-2 are used by Flask-Bootstrap itself, so overriding them directly would cause problems. For example, the styles and scripts blocks are where the Bootstrap CSS and JavaScript files are declared. If the application needs to add its own content to a block that already has some content, then Jinja2’s super() function must be used. For example, this is how the scripts block would need to be written in the derived template to add a new JavaScript file to the document:
Custom Error Pages
When you enter an invalid route in your browser’s address bar, you get a code 404 error page. Compared to the Bootstrap-powered pages, the default error page is now too plain and unattractive, and it has no consistency with the actual pages generated by the application.
Flask allows an application to define custom error pages that can be based on templates, like regular routes. The two most common error codes are 404, triggered when the client requests a page or route that is not known, and 500, triggered when there is an unhandled exception in the application. Example 3-6 shows how to provide custom handlers for these two errors using the app.errorhandler decorator.
Example 3-6. hello.py: custom error pages
Error handlers return a response, like view functions, but they also need to return the numeric status code that corresponds to the error, which Flask conveniently accepts as a second return value.
The templates referenced in the error handlers need to be written. These templates should follow the same layout as the regular pages, so in this case they will have a navigation bar and a page header that shows the error message.
The straightforward way to write these templates is to copy templates/user.html to templates/404.html and templates/500.html and then change the page header elements in these two new files to the appropriate error messages, but this will generate a lot of duplication.
Jinja2’s template inheritance can help with this. In the same way Flask-Bootstrap provides a base template with the basic layout of the page, the application can define its own base template with a uniform page layout that includes the navigation bar and leaves the page content to be defined in derived templates. Example 3-7 shows templates/base.html, a new template that inherits from bootstrap/base.html and defines the navigation bar but is itself a second-level base template to other templates such as templates/user.html, templates/404.html, and templates/500.html.
The content block of this template is just a container <div> element that wraps a new empty block called page_content, which derived templates can define.
The templates of the application will now inherit from this template instead of directly from Flask-Bootstrap. Example 3-8 shows how simple it is to construct a custom code 404 error page that inherits from templates/base.html. The page for the 500 error is similar, and you can find it in the GitHub repository for the application.
Figure 3-2 shows how the error page looks in the browser.
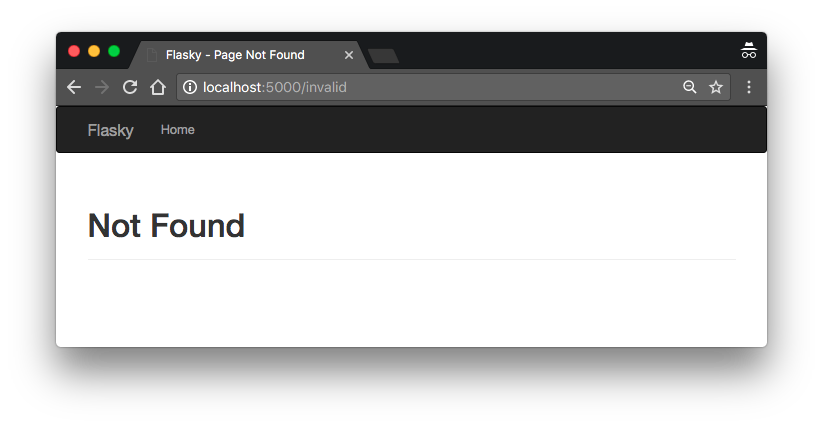
Custom code 404 error page
The templates/user.html template can now be simplified by making it inherit from the base template, as shown in Example 3-9.
Tip
If you have cloned the application’s Git repository on GitHub, you can run git checkout 3c to check out this version of the application.
Links
Any application that has more than one route will invariably need to include links that connect the different pages, such as in a navigation bar.
Writing the URLs as links directly in the template is trivial for simple routes, but for dynamic routes with variable portions it can get more complicated to build the URLs right in the template. Also, URLs written explicitly create an unwanted dependency on the routes defined in the code. If the routes are reorganized, links in templates may break.
To avoid these problems, Flask provides the url_for() helper function, which generates URLs from the information stored in the application’s URL map.
In its simplest usage, this function takes the view function name (or endpoint name for routes defined with app.add_url_route()) as its single argument and returns its URL. For example, in the current version of hello.py the call url_for('index') would return /, the root URL of the application. Calling url_for('index', _external=True) would instead return an absolute URL, which in this example is http://localhost:5000/.
Note
Relative URLs are sufficient when generating links that connect the different routes of the application. Absolute URLs are necessary only for links that will be used outside of the web browser, such as when sending links by email.
Dynamic URLs can be generated with url_for() by passing the dynamic parts as keyword arguments. For example, url_for('user', name='john', _external=True) would return http://localhost:5000/user/john.
Keyword arguments sent to url_for() are not limited to arguments used by dynamic routes. The function will add any arguments that are not dynamic to the query string. For example, url_for('user', name='john', page=2, version=1) would return /user/john?page=2&version=1.
Static Files
Web applications are not made of Python code and templates alone. Most applications also use static files such as images, JavaScript source files, and CSS files that are all referenced from the HTML code in templates.
You may recall that when the hello.py application’s URL map was inspected in Chapter 2, a static entry appeared in it. Flask automatically supports static files by adding a special route to the application defined as /static/<filename>. For example, a call to url_for('static', filename='css/styles.css', _external=True) would return http://localhost:5000/static/css/styles.css.
In its default configuration, Flask looks for static files in a subdirectory called static located in the application’s root folder. Files can be organized in subdirectories inside this folder if desired. When the server receives a URL that maps to a static route, it generates a response that includes the contents of the corresponding file in the file system.
Example 3-10 shows how the application can include a favicon.ico icon in the base template for browsers to show in the address bar.
Example 3-10. templates/base.html: favicon definition
The icon declaration is inserted at the end of the head block. Note how super() is used to preserve the original contents of the block defined in the base templates.
Tip
If you have cloned the application’s Git repository on GitHub, you can run git checkout 3d to check out this version of the application.
Localization of Dates and Times with Flask-Moment
Handling of dates and times in a web application is not a trivial problem when users work in different parts of the world.
The server needs uniform time units that are independent of the location of each user, so typically Coordinated Universal Time (UTC) is used. For users, however, seeing times expressed in UTC can be confusing, as users always expect to see dates and times presented in their local time and formatted according to the customs of their region.
An elegant solution that allows the server to work exclusively in UTC is to send these time units to the web browser, where they are converted to local time and rendered using JavaScript. Web browsers can do a much better job at this task because they have access to time zone and locale settings on the user’s computer.
There is an excellent open source library written in JavaScript that renders dates and times in the browser called Moment.js. Flask-Moment is an extension for Flask applications that makes the integration of Moment.js into Jinja2 templates very easy. Flask-Moment is installed with pip:
The extension is initialized in a similar way to Flask-Bootstrap. The required code is shown in Example 3-11.
Example 3-11. hello.py: initializing Flask-Moment
Flask-Moment depends on jQuery.js in addition to Moment.js. These two libraries need to be included somewhere in the HTML document—either directly, in which case you can choose what versions to use, or through the helper functions provided by the extension, which reference tested versions of these libraries from a content delivery network (CDN). Because Bootstrap already includes jQuery.js, only Moment.js needs to be added in this case. Example 3-12 shows how this library is loaded in the scripts block of the template, while also preserving the original contents of the block provided by the base template. Note that since this is a predefined block in the Flask-Bootstrap base template, the location in templates/base.html where this block is inserted does not matter.
Example 3-12. templates/base.html: importing the Moment.js library
To work with timestamps, Flask-Moment makes a moment object available to templates.Example 3-13 demonstrates passing a variable called current_time to the template for rendering.
Example 3-13. hello.py: adding a datetime variable
Example 3-14 shows how this current_time template variable is rendered.
Example 3-14. templates/index.html: timestamp rendering with Flask-Moment
The format('LLL') function renders the date and time according to the time zone and locale settings in the client computer. The argument determines the rendering style, from 'L' to 'LLLL' for four different levels of verbosity. The format() function can also accept a long list of custom format specifiers.
The fromNow() render style shown in the second line renders a relative timestamp and automatically refreshes it as time passes. Initially this timestamp will be shown as “a few seconds ago,” but the refresh=True option will keep it updated as time passes, so if you leave the page open for a few minutes you will see the text changing to “a minute ago,” then “2 minutes ago,” and so on.
Figure 3-3 shows how the http://localhost:5000/ route looks after the two timestamps are added to the index.html template.
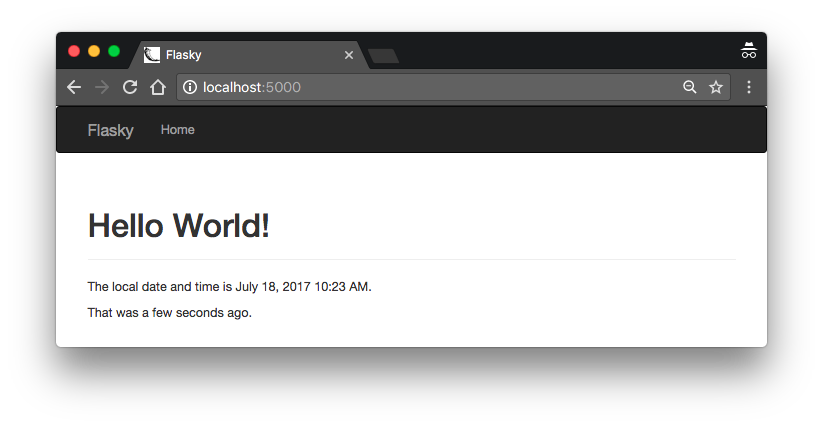
Page with two Flask-Moment timestamps
Tip
If you have cloned the application’s Git repository on GitHub, you can run git checkout 3e to check out this version of the application.
Flask-Moment implements the format(), fromNow(), fromTime(), calendar(), valueOf(), and unix() methods from Moment.js. Consult the Moment.js documentation to learn about all the formatting options offered by this library.
Note
Flask-Moment assumes that timestamps handled by the server-side application are “naive” datetime objects expressed in UTC. See the documentation for the datetime package in the standard library for information on naive and aware date and time objects.
The timestamps rendered by Flask-Moment can be localized to many languages. A language can be selected in the template by passing the two-letter language code to function locale(), right after the Moment.js library is included. For example, here is how to configure Moment.js to use Spanish:
With all the techniques discussed in this chapter, you should be able to build modern and user-friendly web pages for your application. The next chapter touches on an aspect of templates not yet discussed: how to interact with the user through web forms.
Table of contents collapsed